
Frog Loop (Part 1) Top 16 Champions League Niigata
The original article was written by Shintaro Ito. Please find the original Japanese-language article here. Note my translation is not a perfect translation and I have rearranged and reworded some parts of the original article for clarity and readability. I have included external links to Bulbapedia for new cards. Find also some explanatory comments inside square brackets, italicised.
This is Toushin [Shintaro
Ito’s username]. The Champions League Niigata has now been completed.
Thanks to PokemonCardMemo [the original website] reaching out to me, I will be sharing my deck list
here. This article will be an explanation of the deck I ran at the Champions
League Niigata. From here on I will refer to the deck as “Frog Loop.”
The users of this deck were Toushin (@1483toushin3069) [Shintaro Ito, who placed 11th at the event] and Amu (@4mutaaan) [Atsutoshi Kubo, who placed 22nd
at the event].
Considering the Meta and Deck Choice
Firstly, I would like to talk about my idea of the
metagame:
Tier 1:
Tier 2:
- Alolan Ninetales GX + Decidueye GX + Swampert
- Buzzwole GX + Lycanroc GX
- Giratina + Malamar
Anyone could see that one of the main decks to watch out for was
Jirachi Zapdos, as it has had many wins in recent City Leagues [the Japanese equivalent of Cups]. So, I figured I should avoid
bringing a deck with an unfavourable matchup against Jirachi Zapdos.
Lycanroc Zoroark is a deck with high flexibility, as the
main attacker also serves the purpose of being a draw engine. Because of this, I imagined this deck would also be very popular.
Blacephalon Naganadel is a deck that has a fixed direction
of play, and is not a very difficult deck to pilot. Due to this I thought it may
see less use than the other two tier 1 decks.
I wanted to create a deck which would have a high win rate against Jirachi Zapdos, using my reasoning that the deck would be
popular even amongst top players. I considered the following when thinking
about a deck that could have a good matchup against it:
- Using Acerola to recover your high HP Pokémon while denying your opponent prizes
- Restricting Jirachi’s utility by forcing your opponent to match your game tempo
- Using methods other than attacking to take prize cards
- Using non-GX Pokémon to take hits from Assault Thunder (Zapdos’ attack)
However, while achieving a good matchup against Zapdos Jirachi I still wanted to be favoured
against other decks. I also wanted Pokémon which could attack for low energy costs in order to be able to win even while
deaddrawing. I
tried out about 40 different builds, but the decks I had the most confidence in were
Glaceon GX + Vaporeon GX, Alolan Ninetales
GX + Decidueye GX + Swampert and Frog Loop.
Three days before the event I was pretty set on using
Glaceon GX + Vaporeon GX, but in thinking about Frog Loop, I thought it would be a
shame if no one used the deck. I wanted someone from our testing group to win
the tournament, so I decided to play the deck.
On the day of the event, I don’t think the metagame was very different to
what I expected, apart from two groups of players who unexpectedly brought Rayquaza GX.
Deck
List
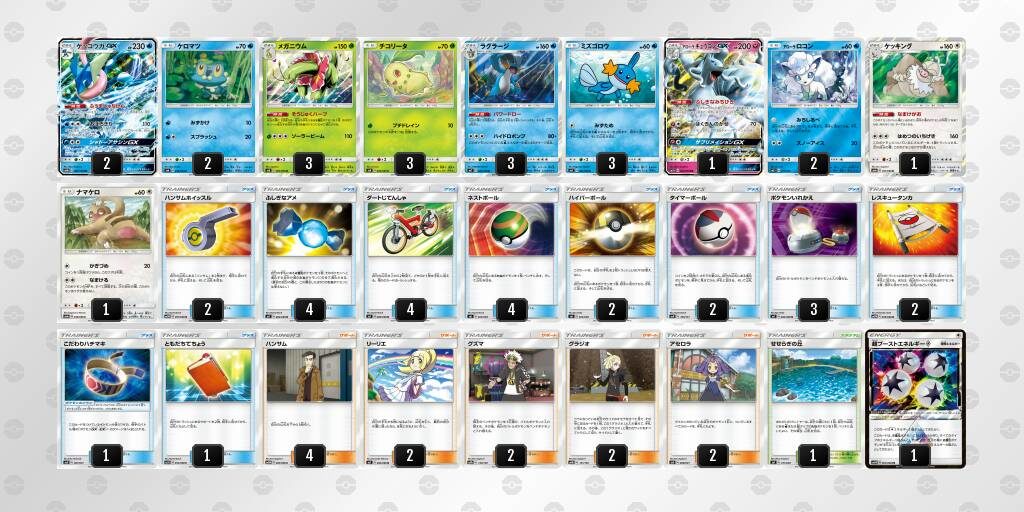
Pokémon (21)
2 Froakie
2 Greninja GX
3 Chikorita
3 Meganium
3 Mudkip
3 Swampert
2 Alolan Vulpix
1 Alolan Ninetales GX
1 Slakoth
1 Slaking
Trainers (38)
4 Looker
2 Lillie
2 Guzma
2 Acerola
2 Gladion
2 Looker Whistle
4 Rare Candy
4 Acro Bike
4 Nest Ball
2 Ultra Ball
2 Timer Ball
3 Switch
2 Rescue Stretcher
1 Choice Band
1 Pal Pad
1 Brooklet Hill
Energy (1)
1 Superboost Energy Prism Star
2-0-2 Greninja GX
Even though a 1-0-1 line could also work, a 2-0-2 line means
that when you return one Greninja GX to your deck you can promote another Greninja GX and
continue this loop indefinitely. With a heavier line of 3-0-3 (or even more), I feel
there is no real benefit to be gained. In fact, it is not a very good card to
open with, so I settled for a 2-0-2 line.
The 30 damage from Greninja’s ability can be key in some
matchups, but I will write about this in the ‘Game Plan’ section. [I assume this will be included in the second part of this article.]
3-0-3 Meganium, 3-0-3
Swampert
This is a deck engine of 12 cards. The idea is to get two of
each out on to your board, so you are able to easily recover even if one of them
is knocked out.
While Swampert is mainly there as your draw engine, in your
last turn it can take your last two prizes. So, in your penultimate turn you
should promote Meganium instead of Swampert so you can protect it and use it to
attack.
2-1 Alolan Ninetales GX
The one-of Alolan Ninetales GX is the card that I was most hesitant on including, right up until the last minute. I really didn’t want to
include it, but I decided I had to in order to be able to search for Rare Candies.
Alolan Vulpix is very strong even if you do not evolve it, as
you can keep using Beacon. This allows the deck to run much more smoothly.
When considering the prize race, sometimes you must think
about not evolving, or evolving and then ending your turn, and then using
Acerola on your Alolan Ninetales GX after you have taken damage. I used these
kinds of plays quite often.
2 Gladion
Superboost Energy is the foundation of this deck. Gladion is
necessary to retrieve the Superboost Energy from your prizes. I also sometimes
used Gladion to get an Alolan Ninetales GX or Rare Candy from my prizes. If you are able to use this card once
during the match, it isn't as necessary to check your prizes (apart from very important cards). This is crucial as rounds are only 25 minutes long [in Japan rounds are best of one with a 25
minute time limit].
4 Rare Candy
The game can go very differently depending on whether you draw
this card or not, so I decided to run the maximum number of copies. During the
game you will probably only use two Rare Candies and the rest will go to paying the cost of Power Draws. However, consider the following situations, in which
having four Rare Candies will make it easier to make a comeback:
- Where your opponent runs Sylveon GX
- Where you have two Meganium prized
- Where your opponent’s deck focusses on Counter Energy [I am assuming Shintaro means spread decks here.]
- Where your opponent runs Cyrus Prism Star
1 Superboost Energy Prism Star
The deck’s only Prism Star card. As your game plan changes
depending on whereabouts this card is, you must always be conscious of whether
it is prized or not. To ensure it does not go to the Lost Zone, be careful
to not leave it somewhere in play.
Trainers
To reach this build of the deck took a substantial amount of
time. The initial build of the deck was based on Professor Elm’s Lecture,
Steven’s Resolve, and Bill’s Analysis to build your board.
In order to use Professor Elm, we had to use Tapu Lele GX.
Then, after using Steven’s Resolve, we could get Judged or Marshadowed, which
would completely ruin our setup. And still, it took many turns until the turn we
could use Greninja GX’s Haze Slash, meaning Jirachi Zapdos and Lycanroc Zoroark
decks could keep attacking our support Pokémon and take all of their prizes.
So, in order to reach the turn where we could begin to Haze
Slash more quickly, I decided to make the deck comprise of essentially 56 cards
by including Acro Bike. This improved matches and made the chances of drawing
dead lower. Acro Bike improved the efficiency and effectiveness of the deck.
Upon the inclusion of this card, Tapu Lele GX more often than not became a
liability, losing me games, so I removed it from the deck. Accordingly, I
removed Professor Elm as well, and the build became one of Lillie + Bill’s Analysis
+ Cynthia.
As I playtested, I found that the turns that I could use Cynthia
with high utility were very limited. As you have multiple stage 2s in the deck, there
are many moving parts that you need to execute combos. This means that once
your hand is big enough, it is in fact better not to use Cynthia. In the case
that your hand is disrupted, you can leave it to Lillie to recover from the situation.
Decidueye Ninetales?
Before Acro Bike was put into the deck, it was impossible to
defeat Ninetales Decidueye if you were even one turn behind.
I considered including Baby Alolan Ninetales, Glaceon GX, Incineroar,
Charizard, Incineroar GX and Cyrus Prism Star. I experimented with all kinds of
techs, but they did not work.
However, Slaking and Porygon Z were potential cards that
could work. They dealt with multiple decks and gave me the ability to improve
matchups. Porygon Z was not very useful against Blacephalon or Jirachi Zapdos,
so I opted to include Slaking instead. In any match, if you place it in the active
position, it can essentially buy you extra turns.
Consider preventing your opponent from using: Decidueye GX’s Feather Arrow, Jirachi’s Wishing
Star, Zoroark GX’s Trade, Magcargo’s Smooth Over, Tapu Lele GX’s Wonder Tag, etc.
It is possible with Slaking to stop your opponent from gaining cards and
developing their board. In this kind of situation, it is difficult for your
opponent to KO a 160 HP Slaking, so I included it to narrow my opponent’s lines
of play.
If your opponent plays Guzma, the ability lock will be
broken, however, this means they cannot use
Acerola, Professor Kukui, or a draw supporter. If one of your benched Pokémon
is knocked out, this means that you still have Slaking for your next turns, so there
is no real disadvantage.
Using Slaking as a wall meant that it was necessary to include
more switching cards in the deck. On top of including Guzma and Acerola, I increased
my counts of Switch by two. By increasing my counts of Switch, it also made it
easier for me to use Alolan Vulpix’s Beacon.
The Last Discovery
After organising my deck and leaving for Niigata, I discovered
a different deck using Looker Whistle. This was honestly luck. I just happened
to discover it.
When I saw Looker Whistle, I realised it addressed three faults my deck was struggling with:
- You can essentially find a Supporter with Alolan Ninetales
- It allows the deck to be more easily thinned
- In a Stage 2 Deck, if you are unable to play Supporters, it is very difficult to do anything
With one Looker Whistle, you gain two turns’ worth of
Supporters. It does not even cost you your Supporter for that turn. There is no
delay, unlike Bill’s Analysis.
I originally had 16 Supporters in the deck, which was not a very smart
decision considering I would probably only play out about 8 turns. I put in 4 Looker
and 2 Looker’s Whistle.
While the effect of drawing three cards tends to be disliked,
I think its utility really depends on the deck. I have experienced playing
Cheren at a past World Championship, so I believe I have correct judgement.
Details
Greninja GX, Meganium, Swampert, Alolan Ninetales GX, Slaking
-> Count of 21
Gladion, Rare Candy, Acro Bike, Superboost Energy ->
Count of 32 (total)
The remaining 28 cards must consist of Supporters, ways of
switching, Pokémon searching cards, Rescue Stretcher and Stadiums. As the only Stadium
which you really must get rid of is Black Market Prism Star, it may not have been
really necessary to include a Stadium. Even then, if you can keep looping Greninja GXs
while Black Market Prism Star is in play, you may be able to force your opponent to
deck out.
Professor Elm and Bill’s Analysis were cards that I personally
tended to whiff, so I did not include them. Cynthia also tended to be useless
so I did not include that either.
Looker and Looker Whistle comprises 6 cards, Guzma is 3
cards, Lillie, Gladion and Acerola are 2 cards each, and you would like to
attack with Greninja 5 times so I included 3 Switch. I included the Choice Band
so you are able to KO a Tapu Lele GX in one turn, two Rescue Stretchers to
recover from early KOs, and the rest of the cards are Ball cards (and one
Brooklet Hill).
I found that throughout a game my counts of Guzma would be very close to running out. So I cut one Guzma and included a one-of Pal Pad to address this problem.
Cards that Didn’t
Make it
Some cards I
considered but did not include, and my reasoning for not including them, is explained below.
Jirachi:
I could use Jirachi to find my Rare Candies, and it is also
a non-GX, unlike Alolan Ninetales GX. However, it is not as reliable as Alolan
Ninetales GX – you have no idea what you will draw.
Baby Alolan Ninetales
You can use this card when you do not need an Alolan
Ninetales GX and have a Vulpix remaining on board. It can serve as a strong
wall. It is strong against cards such as Rayquaza GX and Blacephalon GX, but it is
not necessary as we have Slaking.
Incineroar, Charizard,
Incineroar GX
I thought that if you could forcefully knock out Decidueye GXs you
could win the matchup, but they all get knocked out by Swampert’s Hydro Pump.
Glaceon GX
When I had not yet realised the existence of Slaking, I was
considering Glaceon GX as a counter to Decidueye Ninetales. While it was
strong, it is unnecessary with Slaking.
Cyrus Prism Star +
Counter Catcher
As I run the correct typing for Cyrus, I thought it could be
good but it does not really address the decks at the centre of the meta. I also
want to use my Supporters very conservatively and strictly.
Escape Rope
Since my deck is a comeback deck, the Pokémon I want to
knock out tend to already be in the active position. So my switching card of choice is Switch.
Amu included this card. I did not try out this card for
myself, and I rated Beacon’s strength highly enough to not put one in. However,
it may have been good to include one copy of this card.
I thought it could be useful, but I also realised that I
would not be able to use Beacon. It
makes it awkward when I have two Stadiums in hand when I want to play Lillie,
as I cannot thin my hand down as much as I would like to. So this card wasn’t
included.
As this article has become very long, I will talk about the
strategy of the deck and how to deal with different matchups in the second
part.
Credit to: https://pokemoncardmemo.com/deck/article2018-757/ for the original Japanese-language article.
This comment has been removed by the author.
ReplyDelete