
Champions League Chiba: Top 32 Ultra Necrozma
Please find the original Japanese-language article here. Note my translation is not a perfect translation and I have rearranged and reworded some parts of the original article for clarity and readability. Find also some explanatory comments inside square brackets, italicised.
It is I, the guy who earned 500 CP solely with Ultra Necrozma.
My Twitter account is here: @yamayoshi1026.
This time, I created my own article. I wanted to give an explanation of my deck which made top 32 at the Chiba Champions League.
Furthermore, this entire article is free. That’s right, free!
Just because it is free doesn’t mean that the quality will be compromised.
I want to write this as well as paid articles, so I hope you enjoy this read until the end.
The structure will be as follows:
Conclusion
In order to win, it is very important to consider the metagame. From the results of the City Leagues before the Champions League, decks which had performed well were Pikachu & Zekrom and Ultra Necrozma. Jirachi Zapdos and Pheromosa & Buzzwole were the next most popular. Just looking at City League results, the number of Pheromosa & Buzzwole decks was less than I expected, though I am not entirely sure how many of them there were at the Champions League.
I built each of the popular meta decks and learned how to play each deck to a reasonable level. Pheromosa & Buzzwole was stronger than the decks I used at the City Leagues by a margin, and was a versatile deck that could take different approaches depending on the matchup and board state.
So, I figured that the Champions League Chiba would be similar to the already existing meta: Pikachu & Zekrom, Ultra Necrozma, and Jirachi Zapdos. Besides that, there was also a chance that Pheromosa & Buzzwole would join these three decks in the ranks, though I could not predict how many of them would perform well.
Based on that prediction, I decided to test Pheromosa & Buzzwole against Pikachu & Zekrom, Ultra Necrozma and Jirachi Zapdos, as I needed to see how the deck went up against these top meta decks.
Pikachu & Zekrom vs Pheromosa & Buzzwole
I realised this while testing, but if Pikachu & Zekrom has three Prizes remaining, it is not in a good spot. It is better for Pikachu & Zekrom to make a plan to take six Prizes all at once. With a Full Blitz, Pikachu & Zekrom can put Pheromosa & Buzzwole in one shot range for Tag Bolting it on the bench. If Pheromosa & Buzzwole misses a single turn of healing, you can use Guzma + Choice Band + Electropower + Tag Bolt to take the game.
The lists which performed well at City Leagues didn’t contain a huge number of healing resources so I thought it would be quite easy to follow this plan. So I came to the conclusion that Pikachu & Zekrom had a way of dealing with Pheromosa & Buzzwole.
Ultra Necrozma v Pheromosa & Buzzwole
At the City Leagues held on the 2nd and 3rd of February, the list for Pheromosa & Buzzwole had not been crystallised yet, and at this point I thought that Ultra Necrozma stood a chance against Pheromosa & Buzzwole. However, I came to realise the sheer power of Beast Game.
In the matchup, I assumed Pheromosa & Buzzwole has at least one opportunity to use Jet Punch, and with correct timing and damage placement this means Pheromosa & Buzzwole can use Beast Game on a Jirachi or Malamar. The first Pheromosa & Buzzwole will put in work by spreading damage like this.
After you have one shot a Pheromosa & Buzzwole, your opponent will promote a second and use Lusamine Prism while knocking out your Ultra Necrozma, leaving them with three to four Prizes. By the next turn, Pheromosa & Buzzwole should have eight Energy on it and with Guzma or Counter Catcher, they will bring up your benched Jirachi or Malamar and take their remaining Prizes with Beast Game. If they can set this up, there is no way for Ultra Necrozma to win.
On that note, when Lusamine Prism is used, you can use Gengar & Mimikyu GX’s Horror House GX and then it will be relatively easy for you to win. I decided if I were to play Ultra Necrozma at Chiba, I would be playing Gengar & Mimikyu in it. When I realised this, I imagined a lot of other people would pick up on it too, which turned me off playing Pheromosa & Buzzwole.
Jirachi Zapdos v Pheromosa & Buzzwole
Jirachi Zapdos has a difficult time against Pheromosa & Buzzwole. At City Leagues, a Victini was used, but that was a temporary solution and not one for the long game. Against good players, even if you could take out the first Pheromosa & Buzzwole, you wouldn’t be able to take out the second. Note: At this point I did not think that Jirachi Zapdos would play Hoopa…
If you compare it to City Leagues that occurred after the release of Full Metal Wall, I thought that the number of Jirachi Zapdos would decrease. From considering these matchups and the meta, I decided I would use either Ultra Necrozma or Pikachu & Zekrom.
The reason for my decision was that I had a direct answer to Pheromosa & Buzzwole, which could be played widely. Pikachu & Zekrom aims to take six Prizes at once, while Ultra Necrozma uses Gengar & Mimikyu and knocks out two Pheromosa & Buzzwole without needing to do much, which was an easier plan to carry out.
After considering this, I decided to make a deck that could beat the mirror and other metagame decks.
Aside from Pheromosa & Buzzwole, I thought the meta would be largely the same as previous City Leagues, so I didn’t think about it too deeply. In this metagame Ultra Necrozma and Pikachu & Zekrom were very strong, so I didn’t think too much about other decks.
Next I considered the mirror match. I wondered whether I had more confidence in the Pikachu & Zekrom mirror or the Ultra Necrozma mirror, and I wasn’t sure so I decided to actually play out some games and decide.
Pikachu & Zekrom Mirror
If you can get a Full Blitz off before your opponent, you will win.
If you use Full Blitz second, to take back the lead, you will need to knock out that Pikachu & Zekrom with a Full Blitz accompanied by Choice Band + Electropowers. If you cannot do this, the person who used Full Blitz first will win the game with Tag Bolt.
Ultra Necrozma Mirror
It is also a game about maintaining your lead, but I realised some necessary things to keep in mind as I practiced.
There are two main game plans you can follow:
1. To use Gengar & Mimikyu
2. To use Ultra Necrozma
If you can use your GX move well, you will win the game.
Gengar & Mimikyu
You can use Gengar & Mimikyu’s GX move in the following scenario: your opponent has Tapu Lele and Ultra Necrozma out. Please confirm that your opponent cannot attack in the following turn, and then use Horror House GX. This will give you the first attack, instead of your opponent.
Further, using Horror House GX with two more Energy attached means each player draws until they have seven cards in hand. In a deck like this, which aims to set up multiple Malamars, the additional effect of Horror House is very good. Also, you can use Poltergeist to knock out your opponent’s Pokemon more easily, allowing you to have a higher chance of drawing into Guzma and knocking out one of your opponent’s key cards. Make the most of it.
I don’t mean to say you should do this every time, but if your opponent has multiple GXs on the field, this strategy is probably better.
Ultra Necrozma
While your plan may change mid-game, to use Ultra Necrozma you must spread damage counters using Giratina and Tapu Koko, and attack while putting pressure on your opponent’s board. Regarding the mirror, it is not an exaggeration to say that it is a game of getting you and your opponent’s total remaining Prize cards down to six. One thing you should be wary of is that the only Pokemon that can one shot Ultra Necrozma is Ultra Necrozma. The idea of two shotting Ultra Necrozma with Giratina in a meta where Acerola is prevalent, or putting your own Ultra Necrozma in play, is a dangerous idea in the early game. If you also don’t take Prizes, the total Prize card count will never go to six or below. Even if you plan to use Sky Scorching Light, and make plays to do this, if you don’t take Prizes you can never use Sky Scorching Light.
Moreover, when it becomes a game of trading Giratinas, if you get the first attack you are advantaged. If you are trading one Prize for one, the person who attacks first can get the first Sky Scorching. As Ultra Necrozma gets more popular, I don’t want to deal with this kind of mirror, so I would like to include a Tapu Koko, or attack with Ultra Necrozma to try to speed up the clock, and the mirror will become a more diverse game.
As you can see from the above, I am not sure how to play the Ultra Necrozma mirror correctly. The Ultra Necrozma mirror is a game that can go many ways. I am happy if I get that message across to you.
While I wrote about both the Pikachu & Zekrom mirror and the Ultra Necrozma mirror, I did prefer one over the other. If you are playing the mirror, you know the same amount about the deck you are playing against as your own. I figured I would prefer the Ultra Necrozma mirror as skill can determine the outcome of the match.
Key Cards
Genesect
Key Cards:
Second Marshadow GX
I put this card in largely for the Pikachu & Zekrom matchup. While I understand that instead of having a second Marshadow GX you can use Rescue Stretcher, by running a second copy you reduce the need to dig for the Rescue Stretcher. There are many other games in which you can use it, for example by using Horror House GX with Marshadow, by which you won’t give up three Prizes.
Pokemon Communication
As the number of Pokemon had approached twenty, I thought I would like to try this card out. I switched out two Nest Balls for two Pokemon Communications, and I have written the pros and cons of this change below.
Pros
Report
1. First, Pikachu & Zekrom L
On my first turn, I got three Inkays down.
My opponent knocked out my Active Jirachi with Zapdos (6-5).
If I didn’t start taking Prizes here I would lose, so I Guzmaed up a benched Rayquaza and knocked it out (4-5).
My opponent used Guzma on a Malamar and combined with Electropower, knocked it out (4-4).
I had no way of switching so I had to pass.
My opponent used Full Drive on Marshadow GX (4-2).
At this point I had already lost even if I used Horror House.
2. First, Lycanroc Zoroark W
I got out around two Inkays. My opponent used Lillie and got out Zorua, Zorua, Vulpix and Ditto. Using Ultra Necrozma, I knocked out the Active Zorua (5-6).
My opponent used Zorua’s Stomp.
I used Guzma to knock out the benched Ditto with Tapu Lele (4-6).
My opponent used Zoroark GX to knock out my Ultra Necrozma (4-4).
I used Marshadow GX to knock out my opponent’s Zoroark GX (2-4).
My opponent used Nanu to set up Alolan Muk but was unable to knock out my Ultra Necrozma. I responded with Photon Geyser for the win.
3. First, Blastoise Articuno W
I got three Inkays out. My opponent used Brooklet Hill and ended up getting out an Alolan Vulpix and Squirtle and got out in total about five Pokemon.
On my turn I took a Prize with Ultra Necrozma (5-6).
My opponent used Sublimation (5-4).
I hit back with Giratina.
My opponent just hit back with Alolan Ninetales.
I managed to knock out Alolan Ninetales with Giratina (3-4).
My opponent used Articuno to knock out my Giratina (3-3).
I used Sky Scorching for three Prizes and won.
4. First, Charizard W
I just kept attacking with Giratina and I won.
5. First, Koko Weavile W
On my first turn I saw Sneasel so I made sure to keep my bench small.
My opponent just dead drew and I managed to win with Photon Geyser.
6.First, Hitmonlee/top/chan W
I saw my opponent open with Hitmonlee, so I decided to keep my board small. I finished my turn with Jirachi, Ultra Necrozma, Inkay and Ultra Necrozma, as well as Viridian Forest in play.
My opponent played down Hitmonchan, Hitmonlee, Hitmonlee, and hit Jirachi for thirty with Hitmonchan, switching into Hitmonlee.
I used Photon Geyser to knock out Hitmonlee (5-6).
My opponent used Hitmonlee to knock out my benched Inkay (5-5).
I responded with a Photon Geyser (4-5).
My opponent promoted Hitmontop and knocked out Jirachi (4-4).
On my following turn I benched a bunch of Inkays and used Photon Geyser (3-4).
My opponent went into Hitmonchan and attacked again. He switched into his other Hitmonchan and I Photon Geysered it (2-4).
My Ultra Necrozma was taken out by Hitmonlee (2-2).
Using two Giratina, I took my last two Prizes on Mr Mime and Jirachi with Sky Scorching Light and won.
7. Second, Lycaroc Zoroark W
My opponent played down Zorua and Rockruff from hand and then passed.
I used Marshadow for a turn one Horror House GX.
My opponent couldn’t do anything and passed back to me.
I set up two Malamar and accelerated two Psychic Energy onto Ultra Necrozma, used Poltergeist and knocked out Rockruff (5-6).
My opponent couldn’t draw Double Colourless Energy and did nothing. At this point I knocked out the Active Zoroark and just kept pushing and won.
8. Second, Ultra Necrozma W (versus Kira)
I know Kira’s exact sixty, however my deck list, which I had changed the night before, was unknown to him.
Kira played down two Inkay and a Giratina from hand. I also had two Inkays.
Kira took a Prize with Giratina (5-6).
I got a return knock out with my own Giratina (5-5).
Kira set up another Giratina and knocked out mine (at this point, I had two Malamar with one damage counter each). (5-4)
I used Tapu Koko to Flying Flip.
My Twitter account is here: @yamayoshi1026.
This time, I created my own article. I wanted to give an explanation of my deck which made top 32 at the Chiba Champions League.
Furthermore, this entire article is free. That’s right, free!
Just because it is free doesn’t mean that the quality will be compromised.
I want to write this as well as paid articles, so I hope you enjoy this read until the end.
The structure will be as follows:
Metagame Considerations
The Evolution of the Deck (Versions 1~3)
- Deck List
- Key Card Explanations
The Tournament
- Summary
- Tournament Report
Conclusion
Metagame Considerations
In order to win, it is very important to consider the metagame. From the results of the City Leagues before the Champions League, decks which had performed well were Pikachu & Zekrom and Ultra Necrozma. Jirachi Zapdos and Pheromosa & Buzzwole were the next most popular. Just looking at City League results, the number of Pheromosa & Buzzwole decks was less than I expected, though I am not entirely sure how many of them there were at the Champions League.
I built each of the popular meta decks and learned how to play each deck to a reasonable level. Pheromosa & Buzzwole was stronger than the decks I used at the City Leagues by a margin, and was a versatile deck that could take different approaches depending on the matchup and board state.
So, I figured that the Champions League Chiba would be similar to the already existing meta: Pikachu & Zekrom, Ultra Necrozma, and Jirachi Zapdos. Besides that, there was also a chance that Pheromosa & Buzzwole would join these three decks in the ranks, though I could not predict how many of them would perform well.
Based on that prediction, I decided to test Pheromosa & Buzzwole against Pikachu & Zekrom, Ultra Necrozma and Jirachi Zapdos, as I needed to see how the deck went up against these top meta decks.
Pikachu & Zekrom vs Pheromosa & Buzzwole
I realised this while testing, but if Pikachu & Zekrom has three Prizes remaining, it is not in a good spot. It is better for Pikachu & Zekrom to make a plan to take six Prizes all at once. With a Full Blitz, Pikachu & Zekrom can put Pheromosa & Buzzwole in one shot range for Tag Bolting it on the bench. If Pheromosa & Buzzwole misses a single turn of healing, you can use Guzma + Choice Band + Electropower + Tag Bolt to take the game.
The lists which performed well at City Leagues didn’t contain a huge number of healing resources so I thought it would be quite easy to follow this plan. So I came to the conclusion that Pikachu & Zekrom had a way of dealing with Pheromosa & Buzzwole.
Ultra Necrozma v Pheromosa & Buzzwole
At the City Leagues held on the 2nd and 3rd of February, the list for Pheromosa & Buzzwole had not been crystallised yet, and at this point I thought that Ultra Necrozma stood a chance against Pheromosa & Buzzwole. However, I came to realise the sheer power of Beast Game.
In the matchup, I assumed Pheromosa & Buzzwole has at least one opportunity to use Jet Punch, and with correct timing and damage placement this means Pheromosa & Buzzwole can use Beast Game on a Jirachi or Malamar. The first Pheromosa & Buzzwole will put in work by spreading damage like this.
After you have one shot a Pheromosa & Buzzwole, your opponent will promote a second and use Lusamine Prism while knocking out your Ultra Necrozma, leaving them with three to four Prizes. By the next turn, Pheromosa & Buzzwole should have eight Energy on it and with Guzma or Counter Catcher, they will bring up your benched Jirachi or Malamar and take their remaining Prizes with Beast Game. If they can set this up, there is no way for Ultra Necrozma to win.
On that note, when Lusamine Prism is used, you can use Gengar & Mimikyu GX’s Horror House GX and then it will be relatively easy for you to win. I decided if I were to play Ultra Necrozma at Chiba, I would be playing Gengar & Mimikyu in it. When I realised this, I imagined a lot of other people would pick up on it too, which turned me off playing Pheromosa & Buzzwole.
Jirachi Zapdos v Pheromosa & Buzzwole
Jirachi Zapdos has a difficult time against Pheromosa & Buzzwole. At City Leagues, a Victini was used, but that was a temporary solution and not one for the long game. Against good players, even if you could take out the first Pheromosa & Buzzwole, you wouldn’t be able to take out the second. Note: At this point I did not think that Jirachi Zapdos would play Hoopa…
If you compare it to City Leagues that occurred after the release of Full Metal Wall, I thought that the number of Jirachi Zapdos would decrease. From considering these matchups and the meta, I decided I would use either Ultra Necrozma or Pikachu & Zekrom.
The reason for my decision was that I had a direct answer to Pheromosa & Buzzwole, which could be played widely. Pikachu & Zekrom aims to take six Prizes at once, while Ultra Necrozma uses Gengar & Mimikyu and knocks out two Pheromosa & Buzzwole without needing to do much, which was an easier plan to carry out.
After considering this, I decided to make a deck that could beat the mirror and other metagame decks.
Aside from Pheromosa & Buzzwole, I thought the meta would be largely the same as previous City Leagues, so I didn’t think about it too deeply. In this metagame Ultra Necrozma and Pikachu & Zekrom were very strong, so I didn’t think too much about other decks.
Next I considered the mirror match. I wondered whether I had more confidence in the Pikachu & Zekrom mirror or the Ultra Necrozma mirror, and I wasn’t sure so I decided to actually play out some games and decide.
Pikachu & Zekrom Mirror
If you can get a Full Blitz off before your opponent, you will win.
If you use Full Blitz second, to take back the lead, you will need to knock out that Pikachu & Zekrom with a Full Blitz accompanied by Choice Band + Electropowers. If you cannot do this, the person who used Full Blitz first will win the game with Tag Bolt.
Ultra Necrozma Mirror
It is also a game about maintaining your lead, but I realised some necessary things to keep in mind as I practiced.
There are two main game plans you can follow:
1. To use Gengar & Mimikyu
2. To use Ultra Necrozma
If you can use your GX move well, you will win the game.
Gengar & Mimikyu
You can use Gengar & Mimikyu’s GX move in the following scenario: your opponent has Tapu Lele and Ultra Necrozma out. Please confirm that your opponent cannot attack in the following turn, and then use Horror House GX. This will give you the first attack, instead of your opponent.
Further, using Horror House GX with two more Energy attached means each player draws until they have seven cards in hand. In a deck like this, which aims to set up multiple Malamars, the additional effect of Horror House is very good. Also, you can use Poltergeist to knock out your opponent’s Pokemon more easily, allowing you to have a higher chance of drawing into Guzma and knocking out one of your opponent’s key cards. Make the most of it.
I don’t mean to say you should do this every time, but if your opponent has multiple GXs on the field, this strategy is probably better.
Ultra Necrozma
While your plan may change mid-game, to use Ultra Necrozma you must spread damage counters using Giratina and Tapu Koko, and attack while putting pressure on your opponent’s board. Regarding the mirror, it is not an exaggeration to say that it is a game of getting you and your opponent’s total remaining Prize cards down to six. One thing you should be wary of is that the only Pokemon that can one shot Ultra Necrozma is Ultra Necrozma. The idea of two shotting Ultra Necrozma with Giratina in a meta where Acerola is prevalent, or putting your own Ultra Necrozma in play, is a dangerous idea in the early game. If you also don’t take Prizes, the total Prize card count will never go to six or below. Even if you plan to use Sky Scorching Light, and make plays to do this, if you don’t take Prizes you can never use Sky Scorching Light.
Moreover, when it becomes a game of trading Giratinas, if you get the first attack you are advantaged. If you are trading one Prize for one, the person who attacks first can get the first Sky Scorching. As Ultra Necrozma gets more popular, I don’t want to deal with this kind of mirror, so I would like to include a Tapu Koko, or attack with Ultra Necrozma to try to speed up the clock, and the mirror will become a more diverse game.
As you can see from the above, I am not sure how to play the Ultra Necrozma mirror correctly. The Ultra Necrozma mirror is a game that can go many ways. I am happy if I get that message across to you.
While I wrote about both the Pikachu & Zekrom mirror and the Ultra Necrozma mirror, I did prefer one over the other. If you are playing the mirror, you know the same amount about the deck you are playing against as your own. I figured I would prefer the Ultra Necrozma mirror as skill can determine the outcome of the match.
Transformation of the deck
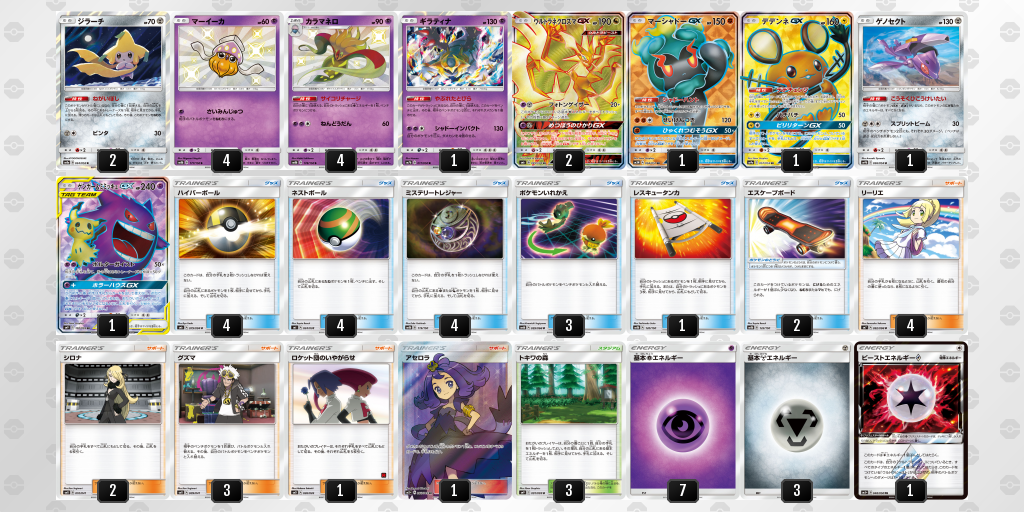
Version 1:Genesect
This card is great against the mirror. It is best to play this when your opponent attacks with Giratina. If you spread your damage to Giratina and two Malamars, this sets up Sky Scorching damage (Giratina will have 70 damage on it if it puts the Shadow Impact damage on itself). Moreover, if your opponent plays down Jirachi and you can get Distortion Door damage on it, it is even better. Also, since it has resistance, it can’t be one shot by Giratina. So this will force your opponent to play Ultra Necrozma. If your opponent plays down a GX, it is easy to get to the number of Prizes needed to use Sky Scorching Light. It is also useful against Jirachi Zapdos and Hitmontop/lee/chan as it makes getting a Sky Scorching off easier.
Gengar & Mimikyu GX
While this was originally a card for Pheromosa & Buzzwole, I ended up using this against almost all my opponents. On my first turn I would set up Inkays, and I could use Horror House GX turn one to ensure I could get my Malamars out. It is also useful to stall to get the first attack in.
Beast Energy Prism Star
Upon putting in Genesect, I realised three Metal Energy were not enough for the mirror. So I decided to add Beast Energy, which is also very good with Ultra Necrozma. If you are worried about getting Metal Energy for Marshadow or Genesect, it is fine to replace this card with another Metal Energy.
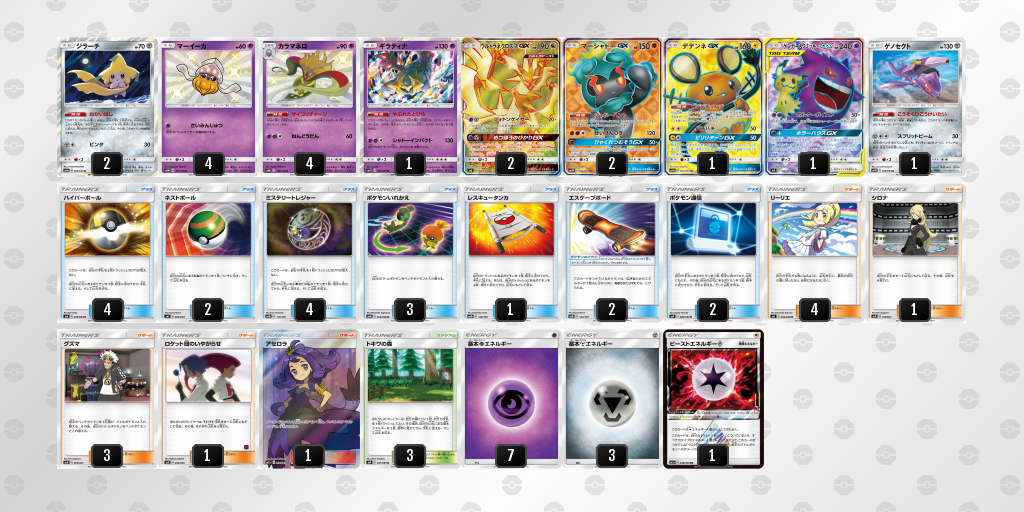
Version 2:
Gengar & Mimikyu GX
While this was originally a card for Pheromosa & Buzzwole, I ended up using this against almost all my opponents. On my first turn I would set up Inkays, and I could use Horror House GX turn one to ensure I could get my Malamars out. It is also useful to stall to get the first attack in.
Beast Energy Prism Star
Upon putting in Genesect, I realised three Metal Energy were not enough for the mirror. So I decided to add Beast Energy, which is also very good with Ultra Necrozma. If you are worried about getting Metal Energy for Marshadow or Genesect, it is fine to replace this card with another Metal Energy.
Version 2:
Key Cards:
Second Marshadow GX
I put this card in largely for the Pikachu & Zekrom matchup. While I understand that instead of having a second Marshadow GX you can use Rescue Stretcher, by running a second copy you reduce the need to dig for the Rescue Stretcher. There are many other games in which you can use it, for example by using Horror House GX with Marshadow, by which you won’t give up three Prizes.
Pokemon Communication
As the number of Pokemon had approached twenty, I thought I would like to try this card out. I switched out two Nest Balls for two Pokemon Communications, and I have written the pros and cons of this change below.
Pros
- It has better synergy with cards with abilities which are activated when played onto the bench
- You can save your Malamars by putting them back into the deck before using Dedenne to discard your hand
- It can still have effect even after your board is full, unlike Nest Ball
- You can use it to return useless Pokemon into your deck, making it easier to use Lillie
- Nest Balls are often better in the early game
- It cannot be used on its own
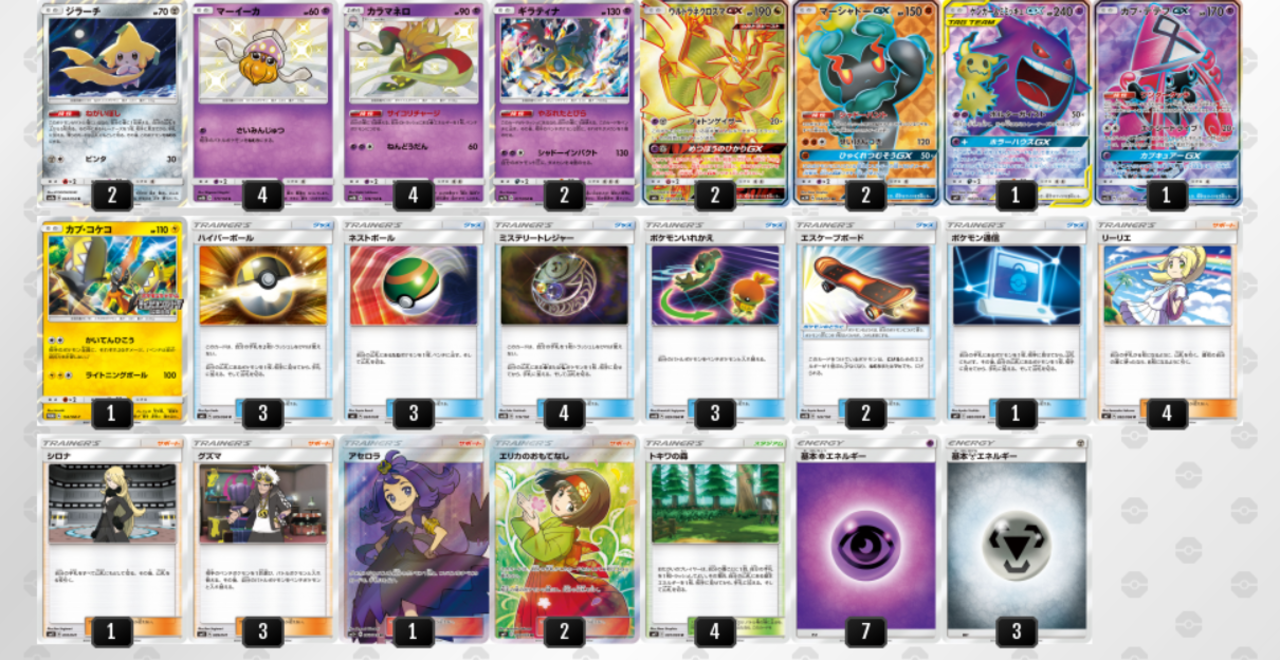
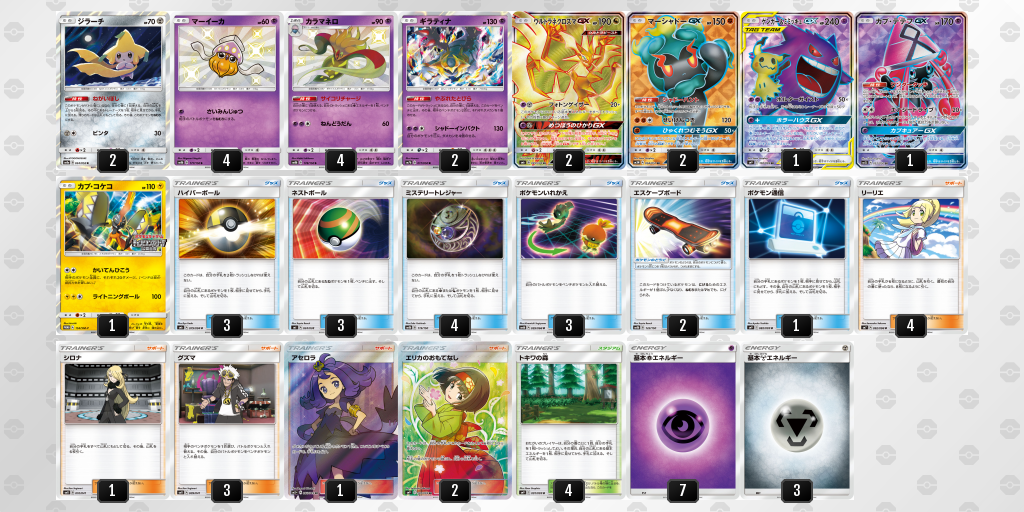
Key Cards:
Tapu Koko
In versions one and two, this spot was reserved for Genesect, but I decided the list was still not perfect. I didn’t think the fourth Metal Energy was particularly good, and Genesect only had utility against the mirror. In that case, I would prefer a free retreater that had a lesser Energy requirement. At the tournament, I hit the mirror twice, and in no situation did I feel that if the Tapu Koko had been a Genesect the game would have gone differently.
Tapu Lele
Originally this had been Dedenne GX, but Tapu Lele could be searched by Mysterious Treasure and Ultra Ball so I switched it. It could also grab Guzma or Acerola, a scenario which came up in the tournament a few times. As the Champions League has eight rounds it is a long day, and while I think I made the correct decision by focussing on consistency, I lost both games against Pikachu & Zekrom so I am still a little conflicted.
Erika’s Hospitality
Up until now, I had been focussing on Pikachu & Zekrom and exploding out of my first turn so I had been running Cynthia, and but I couldn’t resist the number of cards I could draw off Erika. Against Pheromosa & Buzzwole and Melmetal & Lucario Erika isn’t very good, but I believe I am already favoured against those decks, so I think I made the correct decision.
Pikachu & Zekrom
Going first: 60% Going second: 40%
As long as your opponent does not play down Marshadow and Jirachi, you will not be able to use Sky Scorching Light. Basically, this tends to be a matchup where you use Horror House GX. If you are able to set up an advantageous board you will be able to win, however if you fall even a little behind, it will be very difficult for you to come back, so this is a tough matchup. I don’t have anything in particular to say about this matchup, but depending on the situation, you may want to Horror House GX on the first turn while going second.
Ultra Necrozma
Going First: 60% Going second: 45%
I already described how to approach the mirror in the first part of this article.
Pheromosa & Buzzwole
Going First: 80% Going Second: 70%
I also described how to approach this matchup in the first part of the article.
Jirachi Zapdos
Going First: 50% Going Second: 45%
I thought the numbers of this deck would go down from the previous City Leagues due to a rise in Tag Teams, so I didn’t look at the results of these City Leagues too carefully. Depending on the situation, we want to try to win using Giratina, Tapu Koko and then Sky Scorching Light. If you can use Acerola effectively I think this can lead to you winning, but this is difficult to do.
Gardevoir & Sylveon
First: 60% Second: 50%
Unlike my previous list which ran Dedenne, Tapu Lele and Gengar & Mimikyu can become attackers, meaning I can play more flexibly. Of course, it is most efficient to one shot with Ultra Necrozma or Marshadow. If you focus on setting up triple Malamar, I think there is no way you can lose.
Lycanroc Zoroark
First: 55% Second: 50%
Thanks to Gengar & Mimikyu, you can win even if you go second.
If you are going second, it is best to set up Inkays and then use Marshadow to copy Horror House GX. Your win condition becomes setting up an Ultra Necrozma on the bench, and taking Prizes with Marshadow. I also feel that this list is better than the previous in this matchup as the Lycanroc Zoroark deck can’t afford to target down Inkays with the adoption of the second Marshadow and Gengar & Mimikyu.
Lucario & Melmetal
First: 60% Second: 55%
If you are an existing type, you will not lose. Just take care with managing your Metal Energies.
Hitmonlee/Chan/Top
First: 70% Second: 60%
Looking at successful decks from City and Gym Leagues, I felt this was a fairly awkward deck. It wants to use Hitmonchan and then Hitmonlee, but in trying to do so the deck gives up Prizes. The next turn, the deck will use Hitmontop like a mini Buzzwole. This is essentially the last time Hitmontop can spread 60 damage. If we assume that we take Prizes against the deck every turn, when the second Hitmontop gets an attack off, we will have won the game. Looking at typical lists and playing against the deck, the deck needs to get spread off against Ultra Necrozma to be able to win.
Therefore, Ultra Necrozma should keep its bench small until the first time the deck gets a spread attack off and should focus on Ultra Necrozma, as it is the cheapest attacker that is not reliant on Psychic Recharge. Against the deck, you can knock out almost anything by discarding one Psychic Energy.
So, when they get the first Hitmontop out, your bench should comprise of zero to one Inkay. As this Hitmontop is effectively the last Hitmontop, we can start setting up Inkays as soon as this turn is over. You can now finish the game by staying ahead in the Prize race. Because your opponent’s Pokemon all have relatively low HP, it is easy to win off of a Sky Scorching Light. If you don’t bench excess Pokemon, you should be able to win this match.
1. First, Pikachu & Zekrom L
2. First, Lycanroc Zoroark W
3. First Blastoise Articuno W
4. First Charizard W
5. First Koko Weavile W
6. First Hitmonlee/chan/top W
7. Second Lycanroc Zoroark W
8. Second Ultra Necrozma W
Main Draw
1. Second Ultra Necrozma
2. First Pikachu & Zekrom L
Tapu Koko
In versions one and two, this spot was reserved for Genesect, but I decided the list was still not perfect. I didn’t think the fourth Metal Energy was particularly good, and Genesect only had utility against the mirror. In that case, I would prefer a free retreater that had a lesser Energy requirement. At the tournament, I hit the mirror twice, and in no situation did I feel that if the Tapu Koko had been a Genesect the game would have gone differently.
Tapu Lele
Originally this had been Dedenne GX, but Tapu Lele could be searched by Mysterious Treasure and Ultra Ball so I switched it. It could also grab Guzma or Acerola, a scenario which came up in the tournament a few times. As the Champions League has eight rounds it is a long day, and while I think I made the correct decision by focussing on consistency, I lost both games against Pikachu & Zekrom so I am still a little conflicted.
Erika’s Hospitality
Up until now, I had been focussing on Pikachu & Zekrom and exploding out of my first turn so I had been running Cynthia, and but I couldn’t resist the number of cards I could draw off Erika. Against Pheromosa & Buzzwole and Melmetal & Lucario Erika isn’t very good, but I believe I am already favoured against those decks, so I think I made the correct decision.
Matchups
Pikachu & Zekrom
Going first: 60% Going second: 40%
As long as your opponent does not play down Marshadow and Jirachi, you will not be able to use Sky Scorching Light. Basically, this tends to be a matchup where you use Horror House GX. If you are able to set up an advantageous board you will be able to win, however if you fall even a little behind, it will be very difficult for you to come back, so this is a tough matchup. I don’t have anything in particular to say about this matchup, but depending on the situation, you may want to Horror House GX on the first turn while going second.
Ultra Necrozma
Going First: 60% Going second: 45%
I already described how to approach the mirror in the first part of this article.
Pheromosa & Buzzwole
Going First: 80% Going Second: 70%
I also described how to approach this matchup in the first part of the article.
Jirachi Zapdos
Going First: 50% Going Second: 45%
I thought the numbers of this deck would go down from the previous City Leagues due to a rise in Tag Teams, so I didn’t look at the results of these City Leagues too carefully. Depending on the situation, we want to try to win using Giratina, Tapu Koko and then Sky Scorching Light. If you can use Acerola effectively I think this can lead to you winning, but this is difficult to do.
Gardevoir & Sylveon
First: 60% Second: 50%
Unlike my previous list which ran Dedenne, Tapu Lele and Gengar & Mimikyu can become attackers, meaning I can play more flexibly. Of course, it is most efficient to one shot with Ultra Necrozma or Marshadow. If you focus on setting up triple Malamar, I think there is no way you can lose.
Lycanroc Zoroark
First: 55% Second: 50%
Thanks to Gengar & Mimikyu, you can win even if you go second.
If you are going second, it is best to set up Inkays and then use Marshadow to copy Horror House GX. Your win condition becomes setting up an Ultra Necrozma on the bench, and taking Prizes with Marshadow. I also feel that this list is better than the previous in this matchup as the Lycanroc Zoroark deck can’t afford to target down Inkays with the adoption of the second Marshadow and Gengar & Mimikyu.
Lucario & Melmetal
First: 60% Second: 55%
If you are an existing type, you will not lose. Just take care with managing your Metal Energies.
Hitmonlee/Chan/Top
First: 70% Second: 60%
Looking at successful decks from City and Gym Leagues, I felt this was a fairly awkward deck. It wants to use Hitmonchan and then Hitmonlee, but in trying to do so the deck gives up Prizes. The next turn, the deck will use Hitmontop like a mini Buzzwole. This is essentially the last time Hitmontop can spread 60 damage. If we assume that we take Prizes against the deck every turn, when the second Hitmontop gets an attack off, we will have won the game. Looking at typical lists and playing against the deck, the deck needs to get spread off against Ultra Necrozma to be able to win.
Therefore, Ultra Necrozma should keep its bench small until the first time the deck gets a spread attack off and should focus on Ultra Necrozma, as it is the cheapest attacker that is not reliant on Psychic Recharge. Against the deck, you can knock out almost anything by discarding one Psychic Energy.
So, when they get the first Hitmontop out, your bench should comprise of zero to one Inkay. As this Hitmontop is effectively the last Hitmontop, we can start setting up Inkays as soon as this turn is over. You can now finish the game by staying ahead in the Prize race. Because your opponent’s Pokemon all have relatively low HP, it is easy to win off of a Sky Scorching Light. If you don’t bench excess Pokemon, you should be able to win this match.
The Tournament
Matchups:1. First, Pikachu & Zekrom L
2. First, Lycanroc Zoroark W
3. First Blastoise Articuno W
4. First Charizard W
5. First Koko Weavile W
6. First Hitmonlee/chan/top W
7. Second Lycanroc Zoroark W
8. Second Ultra Necrozma W
Main Draw
1. Second Ultra Necrozma
2. First Pikachu & Zekrom L
Report
1. First, Pikachu & Zekrom L
On my first turn, I got three Inkays down.
My opponent knocked out my Active Jirachi with Zapdos (6-5).
If I didn’t start taking Prizes here I would lose, so I Guzmaed up a benched Rayquaza and knocked it out (4-5).
My opponent used Guzma on a Malamar and combined with Electropower, knocked it out (4-4).
I had no way of switching so I had to pass.
My opponent used Full Drive on Marshadow GX (4-2).
At this point I had already lost even if I used Horror House.
2. First, Lycanroc Zoroark W
I got out around two Inkays. My opponent used Lillie and got out Zorua, Zorua, Vulpix and Ditto. Using Ultra Necrozma, I knocked out the Active Zorua (5-6).
My opponent used Zorua’s Stomp.
I used Guzma to knock out the benched Ditto with Tapu Lele (4-6).
My opponent used Zoroark GX to knock out my Ultra Necrozma (4-4).
I used Marshadow GX to knock out my opponent’s Zoroark GX (2-4).
My opponent used Nanu to set up Alolan Muk but was unable to knock out my Ultra Necrozma. I responded with Photon Geyser for the win.
3. First, Blastoise Articuno W
I got three Inkays out. My opponent used Brooklet Hill and ended up getting out an Alolan Vulpix and Squirtle and got out in total about five Pokemon.
On my turn I took a Prize with Ultra Necrozma (5-6).
My opponent used Sublimation (5-4).
I hit back with Giratina.
My opponent just hit back with Alolan Ninetales.
I managed to knock out Alolan Ninetales with Giratina (3-4).
My opponent used Articuno to knock out my Giratina (3-3).
I used Sky Scorching for three Prizes and won.
4. First, Charizard W
I just kept attacking with Giratina and I won.
5. First, Koko Weavile W
On my first turn I saw Sneasel so I made sure to keep my bench small.
My opponent just dead drew and I managed to win with Photon Geyser.
6.First, Hitmonlee/top/chan W
I saw my opponent open with Hitmonlee, so I decided to keep my board small. I finished my turn with Jirachi, Ultra Necrozma, Inkay and Ultra Necrozma, as well as Viridian Forest in play.
My opponent played down Hitmonchan, Hitmonlee, Hitmonlee, and hit Jirachi for thirty with Hitmonchan, switching into Hitmonlee.
I used Photon Geyser to knock out Hitmonlee (5-6).
My opponent used Hitmonlee to knock out my benched Inkay (5-5).
I responded with a Photon Geyser (4-5).
My opponent promoted Hitmontop and knocked out Jirachi (4-4).
On my following turn I benched a bunch of Inkays and used Photon Geyser (3-4).
My opponent went into Hitmonchan and attacked again. He switched into his other Hitmonchan and I Photon Geysered it (2-4).
My Ultra Necrozma was taken out by Hitmonlee (2-2).
Using two Giratina, I took my last two Prizes on Mr Mime and Jirachi with Sky Scorching Light and won.
7. Second, Lycaroc Zoroark W
My opponent played down Zorua and Rockruff from hand and then passed.
I used Marshadow for a turn one Horror House GX.
My opponent couldn’t do anything and passed back to me.
I set up two Malamar and accelerated two Psychic Energy onto Ultra Necrozma, used Poltergeist and knocked out Rockruff (5-6).
My opponent couldn’t draw Double Colourless Energy and did nothing. At this point I knocked out the Active Zoroark and just kept pushing and won.
8. Second, Ultra Necrozma W (versus Kira)
I know Kira’s exact sixty, however my deck list, which I had changed the night before, was unknown to him.
Kira played down two Inkay and a Giratina from hand. I also had two Inkays.
Kira took a Prize with Giratina (5-6).
I got a return knock out with my own Giratina (5-5).
Kira set up another Giratina and knocked out mine (at this point, I had two Malamar with one damage counter each). (5-4)
I used Tapu Koko to Flying Flip.
Kira knocked out my Tapu Koko (5-3), and I again used my own Giratina to knock out his (4-3). He then used Dawn Wings to knock out my Giratina hitting for 120 damage. [Note: I assume the Giratina had damage from its own Shadow Impact or from a Distortion Door.] (4-2).
With the Prizes at 4-2, I can use Sky Scorching Light to knock out Jirachi and two Malamars (1-2).
I would lose if Kira got Beast Energy and used Dawn Wings GX, but thankfully he missed the Beast Energy and I won.
Main Draw
1. Second, Ultra Necrozma W
My opponent opened with Jirachi and benched Tapu Lele, Ultra Necrozma and two Inkay throughout their turn. Realising my opponent had benched two GX Pokemon, I used Marshadow GX to Horror House GX. My opponent simply passed. From here, I was able to set up two Malamars and take a knock out on my opponent’s benched Ultra Necrozma with Poltergeist. (4-6).
My opponent wasn’t able to deal with my Marshadow.
I used Guzma to bring up Tapu Lele and used Photon Geyser for another knock out (2-6).
My opponent used Gengar & Mimikyu’s Horror House GX. I retreated Marshadow while recharging onto it and Ultra Necrozma.
My opponent used Flying Flip…
I used Guzma to bring up Gengar & Mimikyu and won.
2. First, Pikachu & Zekrom L
My opponent opened Absol and I started Marshadow GX.
I was only able to get one Inkay out. My opponent got Jirachi out and managed to pull off a turn one Full Blitz (6-5).
I couldn’t respond. My opponent had Energy everywhere, so even a Horror House GX wouldn’t help. I was destroyed.
Dawn Wings Necrozma GX
With the Prizes at 4-2, I can use Sky Scorching Light to knock out Jirachi and two Malamars (1-2).
I would lose if Kira got Beast Energy and used Dawn Wings GX, but thankfully he missed the Beast Energy and I won.
Main Draw
1. Second, Ultra Necrozma W
My opponent opened with Jirachi and benched Tapu Lele, Ultra Necrozma and two Inkay throughout their turn. Realising my opponent had benched two GX Pokemon, I used Marshadow GX to Horror House GX. My opponent simply passed. From here, I was able to set up two Malamars and take a knock out on my opponent’s benched Ultra Necrozma with Poltergeist. (4-6).
My opponent wasn’t able to deal with my Marshadow.
I used Guzma to bring up Tapu Lele and used Photon Geyser for another knock out (2-6).
My opponent used Gengar & Mimikyu’s Horror House GX. I retreated Marshadow while recharging onto it and Ultra Necrozma.
My opponent used Flying Flip…
I used Guzma to bring up Gengar & Mimikyu and won.
2. First, Pikachu & Zekrom L
My opponent opened Absol and I started Marshadow GX.
I was only able to get one Inkay out. My opponent got Jirachi out and managed to pull off a turn one Full Blitz (6-5).
I couldn’t respond. My opponent had Energy everywhere, so even a Horror House GX wouldn’t help. I was destroyed.
Cards that Missed Out and Potential Additions
Dawn Wings Necrozma GX
While this is really good to use with Marshadow against Pikachu & Zekrom, with Gengar & Mimikyu already in my deck I had no space for this card.
Dedenne GX
Dedenne GX
This was a card I was debating right until the very end. While this card can help you win more games, I decided not to include it because resource management is crucial for this deck and it cannot be found using Mysterious Treasure.
Genesect
Genesect
Upon practicing against the mirror match, I realised if I included this card, four Metal Energy were necessary, so I gave up on trying to include this card as it messed with my idea of the build too much. Including this card, you do have a reasonable advantage in the Ultra Necrozma mirror, so I do recommend you try it.
Absol
Absol
This card is mainly for the Jirachi Zapdos matchup. I didn’t include it because I predicted that the number of Jirachi Zapdos decks would decrease. While there were quite a few Jirachi Zapdos decks that did well, I think if you look at the numbers overall it did decrease.
Ultra Ball (x4)
Ultra Ball (x4)
Scenarios where I was forced to cut down my hand more than I liked and could not manage resources well enough, or where I had to use Ultra Ball to discard other search cards stood out to me, so I didn’t run the fourth Ultra Ball. This may have backfired as this meant I had less options against a deck like Pikachu & Zekrom, but overall I think not having the fourth Ultra Ball allowed me to be able to run the deck while minimising wasted cards.
Thank you for reading my article until the end.
At the Chiba Champions League, I finished an unimpressive top 32 (although I am very happy that I got points!). It was a regrettable tournament: I did not try to test the possibility of decks such as HAND, or Gengar & Mimikyu Fossils, or Jirachi Zapdos with Hoopa.
At the next Champions League Kyoto, I would like to work hard to get an even better result.
If you have any comments or questions, please DM me @yamayoshi1026.
Afterword
Thank you for reading my article until the end.
At the Chiba Champions League, I finished an unimpressive top 32 (although I am very happy that I got points!). It was a regrettable tournament: I did not try to test the possibility of decks such as HAND, or Gengar & Mimikyu Fossils, or Jirachi Zapdos with Hoopa.
At the next Champions League Kyoto, I would like to work hard to get an even better result.
If you have any comments or questions, please DM me @yamayoshi1026.
Please find the original Japanese-language article here.
Comments
Post a Comment