
[Tokyo Champions League 18th Place] Arceus & Dialga & Palkia
Please find the original Japanese-language article here. Note my translation is not a perfect translation and I have rearranged and reworded some parts of the original article for clarity and readability. Find also some explanatory comments inside square brackets, italicised.
Please find the original Japanese-language article here.
Hello, my name is Masaya (@M4S4Y4BW). I usually play in the
Yamanashi prefecture.
In this article I’d like to explain the deck that four
Yamanashi players, including myself, played at the Tokyo Champions League.
Shack (@Shack082) came 18th with our Arceus & Dialga &
Palkia deck.
Deck Explanation
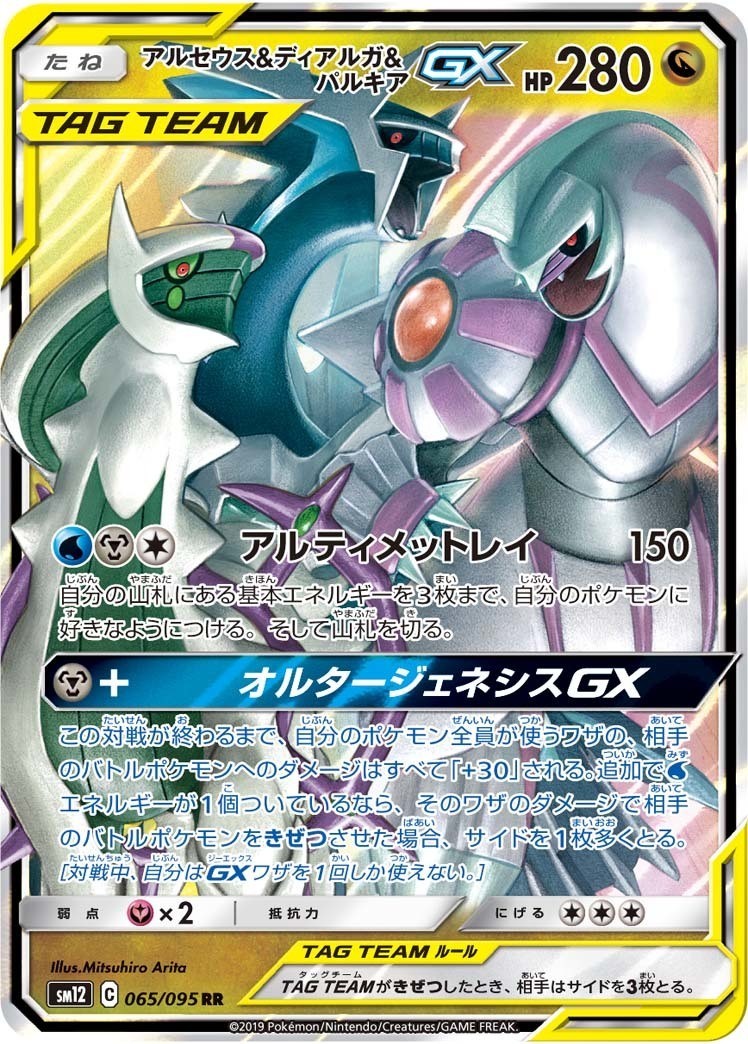
Firstly, I’d like to talk about the main force behind this
deck: Arceus & Dialga & Palkia GX.
The card is used for its “Altered Creation GX” attack,
which, with a Metal Energy and Water Energy, allows you to deal 30 extra damage
with your own Pokemon’s attacks. If your opponent’s Active Pokemon is knocked
out by damage from one of those attacks, you take one additional Prize card.
Please take note: to take the extra Prize card you must
knock out the Active Pokemon with damage from one of your
attacks.
There are ways to take knockouts outside of dealing damage
with attacks. For example, Mew’s Psychic Power or Blacephalon’s Fireworks
Bomb deal damage counters,
Dialga’s Turn Back Time can knock out Pokemon by devolving them and the
effects of Weezing’s Surprise Bomb, Shrine of Punishment, Umbreon &
Darkrai’s Dead Moon GX etc. can take knock outs without dealing damage.
Further, you can’t take an extra Prize card by knocking out
benched Pokemon. Let’s be careful about this.
With this deck, it’s important to think about how quickly
you can get a safe Altered Creation GX off.
What I mean by “safe” is that after you have used Altered
Creation GX, you can ensure that your Arceus & Dialga & Palkia GX will not be knocked out.
In order to do this, it’s necessary to lock your opponent’s
Pokemon in the Active or use hand disruption cards.
The regular attack, Ultimate Ray, is often compared to
Pikachu & Zekrom GX’s Full Blitz.
The differences between Ultimate Ray and Full Blitz are that
you can attach any type of Energy, you can attach them in any way you like and
there is synergy with Counter Gain and attacks with Colourless Energy
requirements.
While at first glance 150 damage doesn’t seem like much,
with Altered Creation GX the damage dealt is raised to 180, which is enough to
knock out Pokemon like Dedenne GX or Tapu Lele GX, cards which are in most
decks. With Choice Band, the damage is bumped up to 210, allowing one shots on
Ultra Necrozma GX, Silvally GX and Zoroark GX.
Thanks to the additional effect of being able to take an
extra Prize card, you can win the game by knocking out two GX Pokemon.
Arceus & Dialga & Palkia GX also has high HP, making
it difficult to knock out as well as a great healing target.
If you can get off an Altered Creation GX and then an
Ultimate Ray with low risk, you will be able to gain advantage in the match.
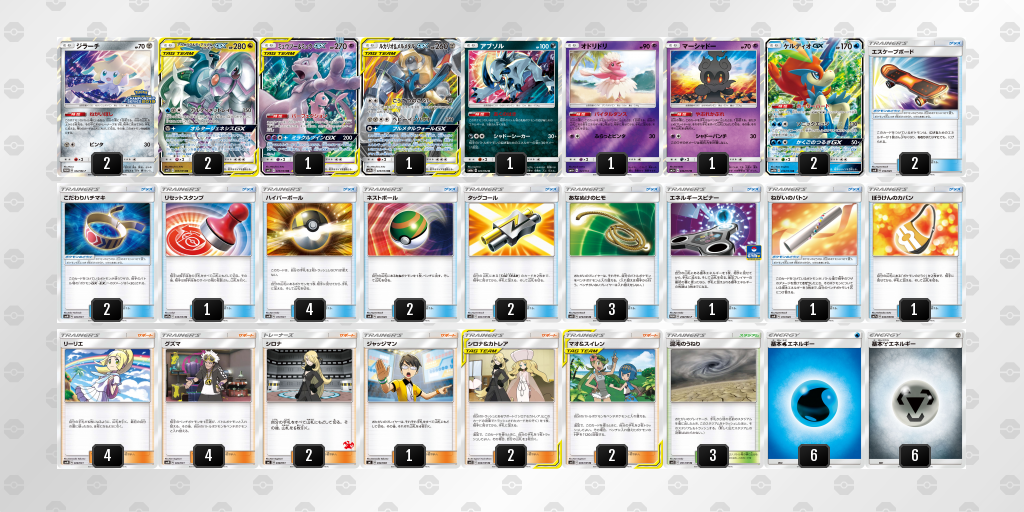
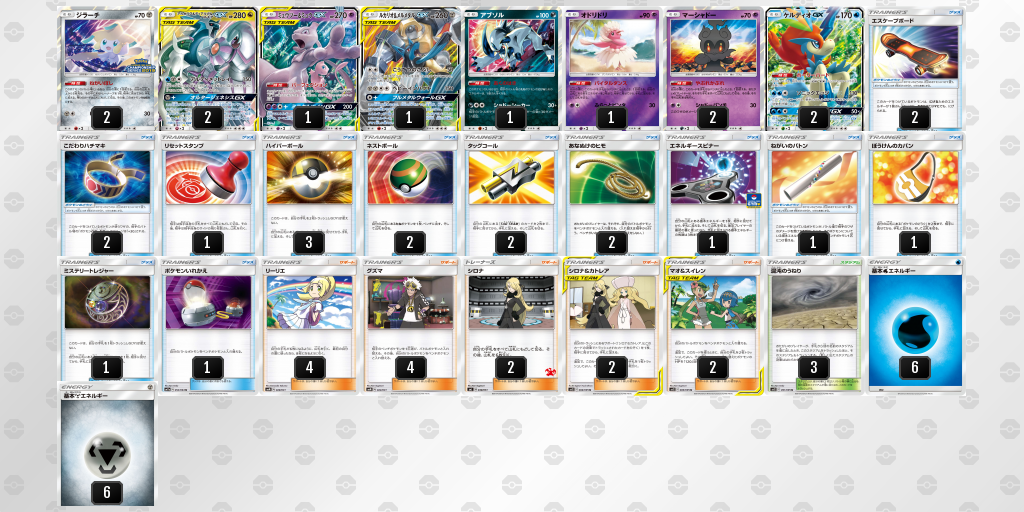
Deck List
These are our deck lists.
The first is our original list, and the second is the one
Shack piloted to an 18th place finish.
The differences between the original and new lists were the
Judge for a second Marshadow, the third Escape Rope for a Switch and the fourth
Ultra Ball for a Mysterious Treasure.
One unique feature of the deck is the high counts of Escape
Rope and Guzma. With high counts of these cards, we could lock an opponent’s
Pokemon in the Active while we used Altered Creation GX, use Jirachi’s Ability
multiple times to find cards that we needed and gust up low HP Pokemon. Further,
to increase the strength of gusting, we implemented Absol.
Thanks to Ultimate Ray, Tag Call, Tag Supporters, Energy
Spinner, Oricorio and Ultra Ball, the deck is able to thin itself very quickly.
This makes it easier to dig for necessary cards using Cynthia & Caitlyn or
Stellar Wish.
We decided against using Dedenne GX or Tapu Lele GX, as if
they came out in the mirror, we would lose. On the contrary, if in the mirror
our opponent had a Dedenne GX or Tapu Lele GX hit the field, we would win.
Essentially, the plan is to safely use Altered Creation GX,
then use Ultimate Ray to set up the next attacker and then to use Escape Ropes
and Guzmas in a liberal manner to quickly take Prizes.
Card Commentary
Pokemon
2 Arceus & Dialga & Palkia GX
Due to the possibility of Prizing, we ran two.
This card is the basis for the deck’s concept.
In matches where Altered Creation GX is used, you should aim
to use it by the second turn.
Ultimate Ray’s Energy acceleration and deck thinning effects
are very powerful.
With Ultimate Ray, you can attach Energy wherever you like. You
should accelerate by thinking carefully about where you can attach in the next
turn.
Note there are some matches where you don’t need to use
Altered Creation GX.
1 Mewtwo & Mew GX
This is mainly to use against decks which can hit for
weakness.
Against Gardevoir & Sylveon GX, you want to use Lucario
& Melmetal’s (which I will talk about later) GX attack, Full Metal Wall GX,
for the additional effect. Depending on the situation, you can attack into a
Gardevoir & Sylveon GX with two Energy attached.
If you use Full Metal Wall GX, you should be able to attach
and use Ultimate Ray in the next turn.
You can also use Keldeo GX’s Sonic Edge. This card has a
high HP of 270, so it's important to remember that it can use Sonic Edge.
1 Lucario & Melmetal GX
Similar to Mewtwo & Mew GX, this card is used against
decks which target weakness or in the mirror match.
While this card is rarely set up via attachments from hand,
if you can’t set up both Mewtwo & Mew GX and this card against Gardevoir
& Sylveon, you can use this card to attack the Gardevoir & Sylveon GX.
If you are attacked into first you will lose as normal, so proceed with
caution.
2 Keldeo GX
This card can resist damage and effects of attacks dealt by
GX Pokemon.
Thanks to the introduction of Chaotic Swell, Keldeo GX now
has an answer to its natural enemy: Power Plant.
It’s difficult to set this card up thanks to its demanding
Energy requirements, and its attacks aren’t particularly efficient. However,
this can be resolved with Arceus & Dialga & Palkia GX’s Ultimate Ray
and Altered Creation GX, making this card a force to be reckoned with.
We can get into trouble if it's Prized, so we have included two
copies. However, there are also quite a few matches where you use both copies.
Against decks with little to no answers to Keldeo GX,
restrict your field so you only have two Keldeo GX in play and push forward
like that.
Its attack, Sonic Edge, ignores all effects on your
opponent’s Pokemon.
This means you can attack Keldeo GX in the mirror, as well
as attack into Hoopa or Pokemon with Fairy Charm attached. Against Gardevoir
& Sylveon, if you are attacking with Mewtwo & Mew GX and they attach
Fairy Charm you can use Sonic Edge.
Thanks to its Ability, it isn’t effected by attacks of GX
Pokemon, meaning you can use Resolute Blade GX even after Clear Vision GX. Keep
this in mind.
2 Jirachi
This card helps search for necessary cards depending on the
situation.
In the early game this card helps to find set up cards or
draw Supporters. After Altered Creation GX, it can find Guzma or other cards to
help take Prize cards. With lots of Escape Rope and Guzma in deck, we can loop
Stellar Wish to continue hunting down benched Pokemon.
As this deck quickly
takes Prize cards, it will be hit by Reset Stamp quite early. Against decks
which can access Reset Stamp quickly or where your deck is not thinned enough,
try to get Jirachi out early.
Originally we ran three copies, but to save space we had to
cut it down to two copes. There are many matches in which you use both, so I’d
refrain from discarding Jirachi carelessly.
Make sure you never forget about the existence of Slap. Even
without Altered Creation GX, you can at least knock out a Shining Mew. After
Altered Creation GX, you can attack for 60 damage.
When using Wishful Baton (which I will discuss later) if
there aren’t good attacking options to move Energy to and no need to move
Energy to give flexibility to retreat, you should attach these Energy to
Jirachi.
1-2 Marshadow
The symbol of the current format: the Let Loose Card Game.
This is a cheat card which can snatch away games.
If you play the game to any degree, you probably know how to
use this card.
Decks which can use this card effectively are generally
powerful.
While there is a chance that if you use Let Loose you will
stagnate your own setup, the setup this deck needs is quite minimal; simply attach
Energy to Arceus & Dialga & Palkia GX. So there’s a relatively low
risk.
1 Oricorio (Vital Dance)
The saviour of this deck. You can effectively search for an
Energy with a Ball card. There isn’t much to say other than that, but there are
a lot of situations where this card can save you.
Rather than running two copies of Energy Spinner we opted to
run one Oricorio for the flexibility of searchability.
With this change, our team mates were thinking that this
card would jump up in price, haha.
1 Absol
The deck’s true trump card. On stream, Santos [Note: one
of the commentators] was giving it high praise.
With this card on the field, you can trap Pokemon with a
single retreat cost with Guzma. This significantly lowers the hurdle of
achieving the main aim of the deck, that is, to use Altered Creation GX safely.
Items
3-4 Ultra Ball, 0-1 Mysterious Treasure
These cards don’t need any explanation.
In order for the deck to draw into Guzma and such, it is
necessary to thin the deck. This is the only card that can search out Marshadow
and Oricorio.
2 Nest Ball
You can search out attackers, Jirachi and Absol.
2 Tag Call
Aside from searching Tag Team attackers, you can find the
draw Supporter Cynthia & Caitlyn or heal with Mallow & Lana.
It’s like a draw Supporter and Ball in one, which I think
says enough about the strength of this card.
With Tag Call, you can search for a Cynthia & Caitlyn and
a Tag Team you won’t need for the match and use that for the cost of the
additional effect, further thinning your deck.
1 Energy Spinner
This is effectively an Energy you can find from a Stellar
Wish.
If you use it on your first turn going second you can get
two more Energy.
If you don’t own an Energy Spinner, you can also use Energy
Lotto. You’ll probably get an Energy off of it.
2-3 Escape Rope 0-1 Switch
This card helps you use Jirachi effectively. It can act as a
pseudo-Guzma, either allowing you to trap one of your opponent’s Pokemon or
hunt it down.
There are some matches in which opening a Tag Team Pokemon
can be detrimental, so you can use this card to retreat out of the Active.
If there are more decks in your meta against which you would
rather knock out the Active you should run Switch, otherwise you should run
Escape Rope. If you have space, you can run a 2-2 split of Switch and Escape
Rope like Jirachi Zapdos does.
1 Reset Stamp
You have to play this card. It disrupts your opponent’s
hand.
Ideally, you’ll first use Let Loose and keep pushing, so you
only need 0-1 copies.
But if you have one, it makes your matchups against Gardevoir
& Sylveon and other decks which are vulnerable to Reset Stamp easier.
You should play it when you’re about to lose, or when you
feel like your opponent will be halted by it. If your opponent slows down
against this deck, they have no chance.
1 Wishful Baton
Usually this should be attached to Arceus & Dialga &
Palkia GX or Keldeo GX in the early game.
If your Arceus & Dialga & Palkia GX is knocked out
before it can use Ultimate Ray, you will almost certainly lose. So this card
tries to offset that.
Against Mewtwo & Mew decks, this card allows you to just
hang in there.
When your plan is to use just two Keldeo GX to attack, this
card can also be useful.
Just being able to set up simply is strong.
Following an Altered Creation GX, it is very strong to use
one of these to prepare for the following turns.
Even apart from setting up backup attackers, it can be used
to spread out Energy for retreating.
Just before the Tokyo Champions League the usage rate of
Field Blower increased, and if your Arceus & Dialga & Palkia GX was one
shot on the second turn you would lose, so I seriously considered running two
copies of the card.
2 Escape Board
You usually attach this to Jirachi. You can also attach it
to Marshadow, Oricorio or Absol as they have one retreat cost, making it easier
to use Guzma and Escape Rope.
2 Choice Band
Attach this to your attackers. You will use one in most
matches, so I ran two copies.
You should track in your mind how much your max damage
output is and what kind of Pokemon you can knock out. After Altered Creation
GX, Keldeo GX can attack for 170 damage and knock out Tapu Lele GX and Dedenne
GX.
Further, Arceus & Dialga & Palkia GX can attack for
210 damage and knock out Zoroark GX and Ultra Necrozma GX.
Without Altered Creation GX, Keldeo GX can’t knock out
Reshiram & Charizard GX in one shot without Choice Band.
In a match where Altered Creation GX isn’t used, you can use
Resolute Blade GX with Choice Band to hit a maximum of 280 damage.
1 Adventure Bag
This allows us to search for the aforementioned Tool cards.
The reason I could run Wishful Baton was thanks to this card.
It’s also useful for thinning your deck.
Supporters
This deck doesn’t run Tapu Lele GX or PokeGear, so we ran
lots of Supporters to ensure we could find one in our opening hand.
4 Lillie
This is the card you want to use on the first turn. While
there aren’t a lot of opportunities to use it in the mid-game to late game, it’s
very useful to draw when you’ve been Reset Stamped to a small hand, so we ran
the maximum count.
2 Cynthia
We ran Cynthia to increase the number of draw Supporters and
to give us a way to refresh our hand.
This card is more effective when the deck is thinned, so
it’s a good card to use in the later stages of the game.
0-1
Judge
As mentioned above in my explanation of Marshadow, this deck
doesn’t need a lot to set up, so this card is really strong.
The big difference between this card and Marshadow is that
this card can be recovered by Cynthia & Caitlyn.
4 Guzma
This card carries the deck. It allows you to stall and to
hunt down targets, so we ran the maximum count. It also allows Jirachi to be
used effectively and can be recovered by Cynthia & Caitlyn.
2 Cynthia & Caitlyn
It’s a draw Supporter and Supporter recovery in one. It’s
the only draw Supporter that can be found with Tag Call.
While its draw power doesn’t appear to be very impressive,
the fact that you can discard one card is quite powerful.
Unlike Lillie, you will always be sure of how many cards you
will draw, and unlike Cynthia you don’t need to refresh your hand, allowing us
to fill a gap in the deck.
When using the Supporter recovery effect, we would normally
recover Guzma or Mallow & Lana.
2 Mallow & Lana
It’s a Switch and healing card in one. The actual discarding of cards to realise the
additional effect is also powerful. It allows you to discard weak cards and to
increase the quality of your deck.
We would usually use this card for the additional effect,
rarely using it just for the Switching effect.
With Ultimate Ray you will usually set up your bench,
meaning that the switching effect of the card is rarely a hinderance.
If you have a Jirachi with Escape Board attached, you can
switch into that and use Stellar Wish, then switch back into the healed
Pokemon, good as new.
Further, if decks target Keldeo GX using Mist Slash without
Choice Band in play, this card can help Keldeo GX endure.
Stadiums
3 Chaotic Swell
This card protects Keldeo GX from Power Plant.
Further, in the current metagame there are lots of decks
which rely on Viridian Forest or Giant Hearth to set up, allowing you to
disrupt their board development. Usually we will play this down as soon as we draw
into it.
Energy
12 Basic Energy
We ran a 6-6 split of Metal and Water Energy. Any less than
12 Energy and you won’t be able to draw into them. Even with 12, we couldn’t
draw into them …
Your Energy will disappear at a crazy rate once you start using
Ultimate Ray. You should always be keeping in mind how many Energy you have
left.
Strategies
The Basic Strategy
Our lives depend on whether we can get a turn two Altered
Creation GX. Use Guzma or Escape Rope to ensure that your opponent can’t hit back.
After you have GXed, hunt down your opponent’s Pokemon with all your might.
Matchups
Mewtwo & Mew
Main attackers: Arceus & Dialga & Palkia GX, Keldeo
GX
Important cards: Wishful Baton
Think of this matchup as one which depends on whether you
can get Wishful Baton to stick or not. Rather than expending your resources on
knocking out Mewtwo & Mew GX, ignore it and target Dedenne GX or Tapu Lele
GX to take two easy knock outs and win.
If you can’t use Altered Creation GX, use two Keldeo GX.
While this is pretty tough, your opponent has no real moves
apart from Mist Slash. You just have to hold on until you can knock out Mewtwo
& Mew GX.
The real question is how much you can attack before you
start getting Mist Slashed.
If you get poked with Marshadow’s Red Knuckle for 10 damage,
you will be knocked out by a Choice Band and Mist Slash combination. So in this
scenario, make sure you heal with Mallow & Lana.
Reshiram & Charizard
Main attackers: Arceus & Dialga & Keldeo GX
Important cards: Absol, Wishful Baton, Chaotic Swell
Surprisingly, this matchup is favoured. Even without any
special strategies, you can play as normal and probably win.
Basically, drop Arceus & Dialga & Palkia GX and use
Altered Creation GX. Similarly to the Mewtwo & Mew matchup, Tapu Lele GX
will be played down to find Kiawe. You can knock it out for three Prizes, so if
you have an opportunity to knock it out, do it.
If you have used Altered Creation GX, you don’t need Choice
Band to knock out Reshiram & Charizard GX with Keldeo GX.
Make sure not to play two Tag Team Pokemon down.
Depending on whether Double Blaze knocks out Arceus &
Dialga & Palkia GX or Keldeo GX your strategy will change.
If Arceus & Dialga & Palkia GX is knocked out, in
order to minimise the number of outs your opponent has to Keldeo GX, try not to
bench any other Pokemon. Continue with two Keldeo GX and steadily attack.
If Keldeo GX is knocked out, take your Prizes with Arceus
& Dialga & Palkia GX and your second Keldeo GX.
Absol is a big influence in this matchup, so try to get it
out as early as possible.
Malamar
Main attacker: Arceus & Dialga & Palkia GX
Important cards: Absol, Chaotic Swell
You will generally win this matchup. You can just play a
normal game and your opponent will struggle.
Use Altered Creation GX and then go hunting for Inkays with
the multitude of Escape Rope and Guzma in deck. There’s no way your opponent
will be able to catch up.
Generally your opponent won’t be able to chain Giratina, but
in the case that they do, make sure to use Mallow & Lana. Your opponent
will struggle.
You have to keep an eye out for Horror House GX into
Poltergeist. You will lose if that happens. Make sure you don’t accumulate
Trainers in your hand in the early game.
If your opponent runs Trevenant & Dusknoir GX, there is
a decent chance that you could lose. While Pale Moon GX is difficult to deal
with, if you can use Ultimate Ray first, or if you have Escape Rope or Guzma,
it won’t be a problem.
In order to avoid the knocking out effect of Pale Moon GX,
make sure to use Guzma or Escape Rope. There is a possibility that Night Watch
hits the right cards and you lose, but your opponent must get very lucky. But
you should try to leave your powerful draw Supporters in deck, and be careful
of how you play throughout the game.
Silvally, Zoroark
Main attackers: Arceus & Dialga & Palkia GX, Mewtwo
& Mew GX, Lucario & Melmetal GX
Important cards: Choice Band, Mallow & Lana
This matchup doesn’t require anything special.
Essentially, use Altered Creation GX and then knock out two
GX Pokemon. With Choice Band, Ultimate Ray can hit for 210, so Choice Band is
very important.
Make sure you use Mallow & Lana so that your Tag Team
Pokemon are free of damage counters.
As these decks run Alolan Muk, make sure not to play down
Keldeo GX.
Alolan Muk also stops Jirachi, but if you have a hand with
enough Guzma etc. you can ignore the Alolan Muk and just go after GX Pokemon.
If Alolan Muk comes out in the early game, this is actually
a good opportunity. Drag the Alolan Muk out with Guzma and then use Altered
Creation GX.
Be careful of the Mimikyu that’s sometimes in Silvally
decks.
Both Zoroark and Silvally decks have a diverse range of
backup attackers, so you can use multiple Tag Team Pokemon to attack for the
relevant weakness.
Gardevoir GX
Main attacker: Mewtwo & Mew GX, Lucario & Melmetal
GX, Arceus & Dialga & Palkia GX
Important cards: Marshadow
This is a difficult matchup.
Try to play so that weakness doesn’t affect you too much. I
think it’s best to discard Arceus & Dialga & Palkia GX and use Altered
Creation GX with Mewtwo & Mew GX.
Lucario & Melmetal GX can hit Gardevoir GX for weakness,
so let’s try to take advantage of that.
An early game Marshadow is incredibly important. You can
disrupt your opponent’s hand after they have used Beacon, for example.
If it’s too difficult to use Altered Creation GX with Mewtwo
& Mew GX, there are some situations where you can also use Arceus &
Dialga & Palkia GX and gain momentum in the match that way.
Gardevoir & Sylveon
Main attacker: Lucario & Melmetal GX, Mewtwo & Mew
GX, Keldeo GX
Important cards: Chaotic Swell, Mallow & Lana
In this matchup, there is no need to use Altered Creation
GX. Just scoop if you open with Arceus & Dialga & Palkia GX.
Power up a Mewtwo & Mew GX or a Lucario & Melmetal
GX. If your opponent uses Fairy Song, Guzma the Gardevoir & Sylveon GX with
two Energy and use Full Metal Wall GX.
After this point, your strategy may vary.
If you used Mewtwo & Mew GX to attack with Full Metal
Wall GX, discard one Arceus & Dialga & Palkia GX and use Ultimate Ray,
setting up Keldeo GX or Lucario & Melmetal GX.
If you attacked with Lucario & Melmetal GX, try to
ensure that you get the first attack in. If it seems like a Kaleidostorm is
brewing, retreat Lucario & Melmetal GX to the bench and manually attach to
it there. If all seems clear, attack an Energy-less Gardevoir & Sylveon GX
with Steel Fist.
If you manage to set up two attackers, you generally won’t
lose. Remember to use Mallow & Lana to heal damage throughout the match.
Attacking even once with Heavy Impact will greatly affect the match.
Lucario & Melmetal
Main attacker: Arceus & Dialga & Palkia GX, Keldeo
GX
Important cards: Mallow & Lana
This is a matchup where all you can really do is continue
persisting. Rather than formulating a concrete plan, it’s more important to
work with the cards that you have.
Basically, the real match starts when all your Energy are
discarded. I will say this many times, but you just have to persist.
As Lucario & Melmetal decks usually don’t have a huge
bench, it’s easy to take advantage of Escape Rope and use it as a pseudo-Guzma,
so you can take some Prizes like this.
This deck usually runs high counts of Power Plant, so keep
in mind that your Keldeo GX could be knocked out at any time.
Shack’s tournament
report
Round 1: Mewtwo &
Mew Malamar, 6-0, Second, W
Although my opponent got a turn two Clear Vision GX off,
thanks to my turn one Let Loose we both had relatively slow set ups. I was able
to press forward slowly with Arceus & Dialga & Palkia GX and Keldeo GX.
My opponent didn’t realise that Keldeo GX was unaffected by Clear Vision GX, so
filled up their bench. I attached Choice Band and attacked Mewtwo & Mew GX
for 280 damage to win.
Round 2: Lucario &
Melmetal Jirachi, 6-?, Second, W (Sannigo)
I was up against the eventual champion of the Tokyo Champions
League.
From my previous practice, I knew this was an unfavoured
matchup, so when I saw Lucario & Melmetal GX I turned pale.
Assuming my Keldeo GX would be attacked into due to Power
Plant, I decided to play the match with two Arceus & Dialga & Palkia
GX. I was ready for the Full Metal Wall GX after my Altered Creation GX.
Using Absol and Mallow & Lana, I was able to slow down
my opponent’s play. I somehow got three Energy on board and won by knocking out
two Jirachi and a Dusk Mane Necrozma.
Round 3: Lucario &
Melmetal Jirachi, 6-3, First, W (Halle)
Halle is the Japan Championships 2019 runner up.
I heard from my team mate that he was playing Lucario &
Melmetal Jirachi, and although I was sceptical this ended up being correct.
Unfortunately my Absol, which was useful in the second
round, was Prized. However, I used Guzma to bring up my opponent’s Absol and
used Altered Creation GX. My opponent had to use Guzma & Hala two turns in
a row to search for Energy to retreat with.
My opponent’s hand was low, so after Full Metal Wall GX I
was able to slowly attach three Energy, and used two Arceus & Dialga &
Palkia GX to knock out a Lucario & Melmetal GX and a Jirachi to win.
Round 4: Pikachu &
Zekrom, 6-3, Second, W
I opened with Mewtwo & Mew GX, while my opponent started
with Zeraora GX.
My opponent managed to get four Lightning Energy in the
discard but passed without using Tapu Koko Prism Star’s Ability.
I used Guzma on the Tapu Koko Prism Star, switching into my
Keldeo GX. I began attaching to my Mewtwo & Mew GX.
My opponent attached to Tapu Koko Prism Star and retreated.
There were quite a few Lightning Energy in the discard now. My opponent Full
Blitzed into Keldeo GX, accumulating six Energy on their Active. I switched into
Mewtwo & Mew GX and used Full Metal Wall GX.
With this, my opponent’s plan was halted. I used Mewtwo
& Mew GX and attacked with Ultimate Ray.
After my Mewtwo & Mew GX was knocked out, I used Keldeo
GX to win.
Round 5: Arceus &
Dialga & Palkia GX, 6-0, Second, W
The mirror match. Although going second in the mirror is
quite unfavourable, my opponent benched Tapu Lele GX and Dedenne GX. I was able
to comeback by knocking these out with Arceus & Dialga & Palkia GX and
Keldeo GX.
Round 6: Reshiram
& Braixen, 6-2, First, W
My opponent used Kiawe on Reshiram & Braixen GX on their
first turn, so on my second turn I had two Energy and Wishful Baton on Arceus
& Dialga & Palkia GX with a Keldeo GX on the bench, and used Altered
Creation GX.
On the following turn, my opponent played down Power Plant
and used Great Catcher to drag up my Keldeo GX, knocking it out. However,
Arceus & Dialga & Palkia GX remained unharmed. I played down Chaotic
Swell and used Let Loose, then attached three Energy to my second Keldeo GX. I
created a huge hurdle for my opponent, winning the game.
Round 7: Reshiram
& Charizard, 6-0, First, W
My opponent mulliganed and I saw Giant Hearth, Fire Energy
and Power Plant. I was devastated as I opened with Lucario & Melmetal GX.
I played down Chaotic Swell, Absol and used Let Loose,
completely slowing down my opponent. I was able to set up Keldeo GX and Arceus
& Dialga & Palkia GX to win.
Round 8: Gardevoir
& Sylveon, 6-0, Second, W (Amu)
I was up against a professional player.
Thankfully, neither my Mewtwo & Mew GX or Melmetal &
Lucario GX were Prized, so I was able to carry out my plan. On my second turn,
I used Guzma on the benched Gardevoir & Sylveon GX which had Energy
attached to it due to Fairy Song. I used Full Metal Wall GX with Mewtwo &
Mew GX, and then was able to use Ultimate Ray twice, knocking out Gardevoir
& Sylveon GX.
I had prepared Lucario & Melmetal GX and my opponent had
no choice but to attempt to attack with their Mega Lopunny & Jigglypuff GX.
Assuming my Mewtwo & Mew GX would be knocked out, I used Ultimate Ray.
My opponent used Mega Lopunny & Jigglypuff GX’s GX
attack with five Energy attached, leaving my Active asleep and sniping Lucario
& Melmetal for 170. If my opponent had Guzma next turn, that would mean
trouble for me. I flipped tails for sleep, but I had a Switch in hand so I
knocked out the Mega Lopunny & Jigglypuff GX to win.
Although my opponent had been gathering Supporters like Lt
Surge’s Strategy with Green’s Search in the early game, my two Let Loose
Marshadows were able to shake up that plan.
Round 9: Psychic
Mewtwo & Mew, 3-6, First, L (Kou)
This match was on stream. I used Let Loose on the first turn
and was able to attach a Metal Energy to Arceus & Dialga & Palkia GX. I
thought I was in a decent position. However, come my second turn, I was unable
to find a Water Energy. I couldn’t even find Wishful Baton with Adventure Bag
because it was Prized, and my plan was ruined. The opposing Mewtwo & Mew GX
knocked out Marshadow and Arceus & Dialga & Palkia GX, and I was behind
by four Prizes.
However, after that, I was able to proceed with Keldeo GX as
it seemed difficult for my opponent to break through its barrier. I used its GX
attack with Choice Band attached to take down the Mewtwo & Mew GX. Now I
had taken three Prizes.
As long as my opponent didn’t use Mist Slash with Choice
Band attached I could use Mallow & Lana and make a comeback. I hoped for
this, buy my opponent was able to find Choice Band and used Mist Slash.
At this point, it was impossible for me to win by attacking.
My opponent had two cards left in deck so I had to shift my strategy to decking
out. I had to choose between dragging up Onix with two Energy attached or
leaving my Keldeo GX Active. My opponent had used three Guzma, but there was a
possibility of the fourth Guzma, Mallow & Lana, Switch or Double Colourless
Energy (of which there were our left), so I decided to leave Keldeo GX in the
Active.
Ultimately, my opponent drew Guzma so I lost.
After the match, I confirmed that there were four Guzma and
no Switch left in Kou’s deck. I was considering that Kou didn’t run any Switch
due to the way that he had played throughout the game. I also forgot about Double Colourless Energy. This
was very painful. I will reflect on it.
Round 10: Arceus &
Dialga & Palkia, Second, L (Mana)
I was up against the winner of the Kyoto Champions League
2019.
It was a mirror match, and the contents of our deck were
pretty similar.
I lost scissors-paper-rock and wasn’t able to get an
attachment on my first turn. I gave up halfway through.
My opponent was able to proceed smoothly, however they had
discarded one Keldeo GX, meaning they only had one left. I realised that if I
could knock out the remaining Keldeo GX, I had a chance to win. I used Alter
Genesis GX without the additional effect and began to power up a Keldeo GX.
However before I could attack Mana used Guzma and I lost.
This is the end of the article.
The release of Tag All Stars won’t affect the metagame of
the Tokyo Champions League much, so you can use this deck until 29 November,
when the card pool will drastically change.
If you have any questions or comments, please send them to
Masaya (@M4S4Y4BW).
If you enjoyed this article, I would be very happy if you
donated. Proceeds will be used to purchase a Turbo Strike Solgaleo GX.
Thank you for reading until the end.
This comment has been removed by a blog administrator.
ReplyDeleteI read this article, it is really informative one. Your way of writing and making things clear is very impressive. Thanking you for such an informative article. Fire Stove Metal Fabrication in USA
ReplyDelete