
[Top 8 City League] Raichu & Alolan Raichu Pheromosa & Buzzwole
Please find the original Japanese-language article here. Note my translation is not a perfect translation and I have rearranged and reworded some parts of the original article for clarity and readability. Find also some explanatory comments inside square brackets, italicised.
My name is Kisaragi. This time, I'd like to write a reflection on the deck I used at the City League, Raichu & Alolan Raichu Pheromosa & Buzzwole.


Please find the original Japanese-language article here.
My name is Kisaragi. This time, I'd like to write a reflection on the deck I used at the City League, Raichu & Alolan Raichu Pheromosa & Buzzwole.
Introduction
I managed to place in the top 8 of the City League using
this deck. Thank you to the people I played against on the day and the people
who helped me fine-tune the deck and encouraged me. While I haven’t really had
any other significant results, I'll be releasing this article for free, so I'd be very happy if you read until the end.
Why I Chose the Deck
Firstly, I want to write about the reasoning behind my deck
choice. The main reason was…
because I liked the deck.
Further,
- It can deal with rogue decks; and
- It’s not a common deck, so it’s possible to catch opponents by surprise.
I didn’t have a lot of time to practice, so I stuck with the
deck I had experience with. I understood the deck’s ability and flexibility,
and I felt that I'd rather lose with a deck I liked than switch to a
different deck right before the tournament, so I played this deck.
The Tournament
My results throughout the day were as below.
Qualifying Round
Giratina & Garchomp Trevenant & Dusknoir 6-3 W
Psychic Box 0-3 L (Benched out)
Dark Box 6-0 W
Spiritomb 6-1 W
Arceus & Dialga & Palkia Blastoise & Piplup
3-6 L
Final result: 3-2 (16th)
Main Round
Zoroark Persian 6-3 W
Golurk 1-6 L
I really lucked out managing to just slide into the Main Round,
even though I eventually made top 8. Looking back at my tournament result, I’m
not even sure if my record is good…
To be honest, I expected Reshiram & Charizard, Mewtwo
& Mew etc. so what I faced on the day was quite different (Trevenant &
Dusknoir and Golurk were decks which could target my weaknesses).
I felt that Pheromosa & Buzzwole and Beast Ring exceeded
expectations, often catching my opponents off guard.
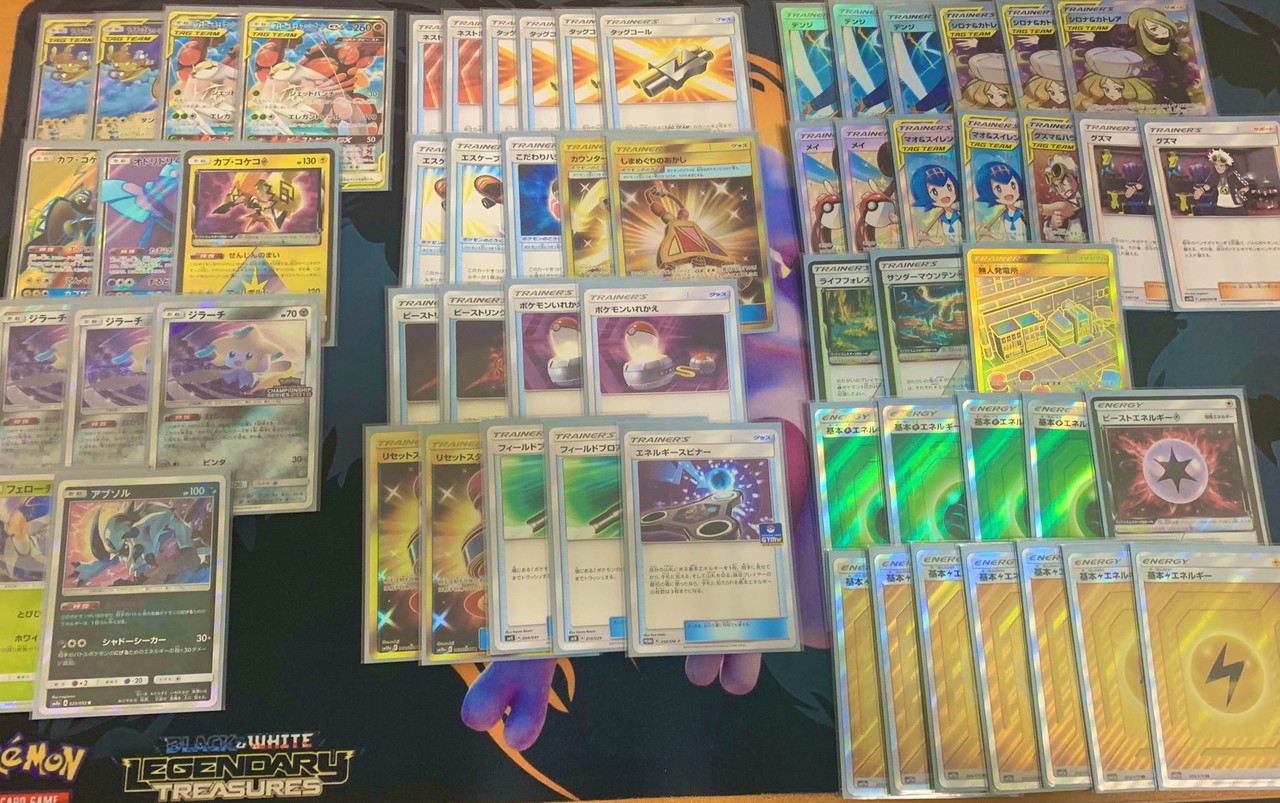
Deck List and Card Choices
I put my list up on Twitter, but you can also see it below.
(Once I realised how much I loved the deck, I began to buy rarer cards…)
If I wrote about all my card choices this would get too long,
so I'll just talk about some of the more interesting ones.
Pheromosa
This card is a non-GX Ultra Beast and has free retreat. Against Reshiram & Charizard, where it is difficult to bench
Pheromosa & Buzzwole GX, I Beast Ringed onto this card and then played down
Tapu Koko GX. The reason I ran this over Kartana was simply due to higher HP
and the ability of Pheromosa to knock out Keldeo GX with Beast Ring.
Counter Gain
This is one of the deck’s key cards. It's so strong that,
in the mid-game, it can set up Pheromosa & Buzzwole GX and Raichu &
Alolan Raichu GX at once. Further, if
either Thunder Mountain Prism Star or Tapu Koko Prism Star is Prized, it’s
still possible to set up your Raichu & Alolan Raichu GX in one turn.
Attaching this to any Pokemon is good, but Raichu & Alolan Raichu GX lacks
Energy acceleration so it’s often attached there.
Island Challenge Amulet
Usually I'll attach this to Oricorio GX. Often people will
Guzma to get around Raichu & Alolan Raichu GX’s paralysis, so I wanted to
make it so they could only take one Prize. Further, except against Blacephalon,
if I attach Island Challenge Amulet there are more paths to win with Pheromosa
& Buzzwole GX’s Beast Game GX.
Energy Spinner
Essentially, this is so that it is possible to find Grass
Energy from Volkner. Originally, I wanted this to be Net Ball, but I would
rarely search for Pheromosa & Buzzwole GX or Pheromosa. After considering
the usefulness of playing this on the first turn going second or being able to
find two Lightning Energy from Volkner, I decided to run Energy Spinner.
(However, if you can’t get your hands on Energy Spinner, there’s absolutely no
problem with running Net Ball instead.)
Rosa
This is the deck’s second key card. You’re probably thinking
that I’m crazy for running Rosa in a Tag Team centric deck, but Rosa actually
gives a huge burst of power in this deck. I'll go into further detail later,
but the ability to find even one or two cards is very powerful.
Considering that I can find this with Jirachi and want to reduce my chances of dead drawing, I ran two copies. I felt that running two was the best balance between power and consistency.
Considering that I can find this with Jirachi and want to reduce my chances of dead drawing, I ran two copies. I felt that running two was the best balance between power and consistency.
The Roles of Raichu & Alolan Raichu GX and Pheromosa
& Buzzwole GX
I posted this on Twitter as well, but below is a diagram
showing how the work between Raichu & Alolan Raichu GX and Pheromosa &
Buzzwole GX should be divided:
The closer to Raichu & Alolan Raichu GX, the more
reliant you should be on Raichu & Alolan Raichu GX in that matchup, and
likewise for Pheromosa & Buzzwole GX. In general, against Tag Teams you
want to use Raichu & Alolan Raichu GX, and for other GX or non-GX Pokemon
you want to use Pheromosa & Buzzwole GX. However, you may use Raichu &
Alolan Raichu GX as an additional attacker in the Malamar matchup.
For non-GX Pokemon that Pheromosa & Buzzwole GX can’t
handle, the matchup is very difficult. I thought there wouldn’t be many of
these kinds of decks, so I didn’t bother putting any techs in (the decks in the
lower right).
To sum up the matchups, Tapu Koko GX can always swoop in to
save the day.
Considering the main decks in the metagame, I think of the
matchups against them like this:
Thanks to Raichu & Alolan Raichu GX’s comeback ability
against Tag Team Pokemon, it's possible to get back into a match even from a
disadvantaged position. Rather than Zoroark and Malamar being unfavoured, this
deck struggles with hand disruption, which is the reason for the positioning of
those matchups. If they are not Trevanent & Dusknoir variants or Zoroark
Persian control variants, I think the matchup becomes a bit easier.
Basic Strategies
I am going to explain strategies under the assumption that
your opponent is unable to affect your board state. Looking at all these
possible moves and then figuring out what pieces you need is how you play this
deck: like a chess puzzle. I've included strategies for specific matchups in
the postscript.
Basic Move 1: Volkner ➔ Tag Call ➔ Cynthia &
Caitlyn
I used this move a lot, as it guarantees Supporters for
three turns in a row. For this deck the midgame is the most important, so
making your early game flow better is really strong. The counts of Volkner and
Jirachi in the deck are such so that there's a high probability of pulling off
this move on the first turn.
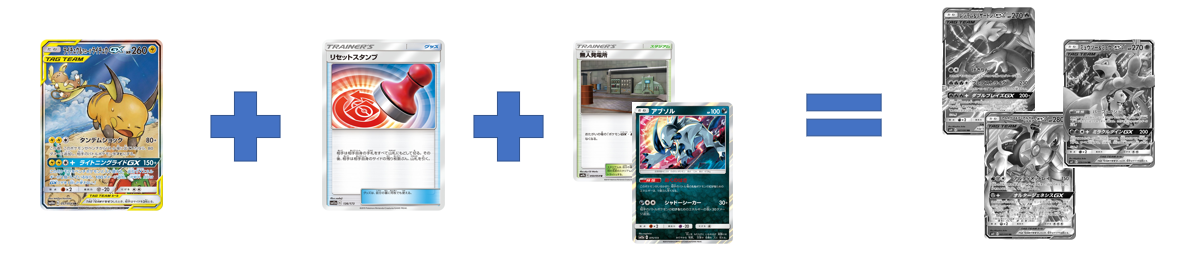
Basic Move 2: Raichu & Alolan Raichu + Reset Stamp
This is a strategy used to close out games against Tag Team
decks. If you can pull this off against Tag Team decks, you should be able to
make something of it – it’s that strong. Further, if you can get Absol or Power
Plant in play, this forces your opponent to find more pieces. If your opponent
topdecks Guzma, you'll simply have to accept their luck.
If you imagine Raichu & Alolan Raichu GX
fighting against incredibly strong Pokemon by paralysing them, it’s actually
really cute.
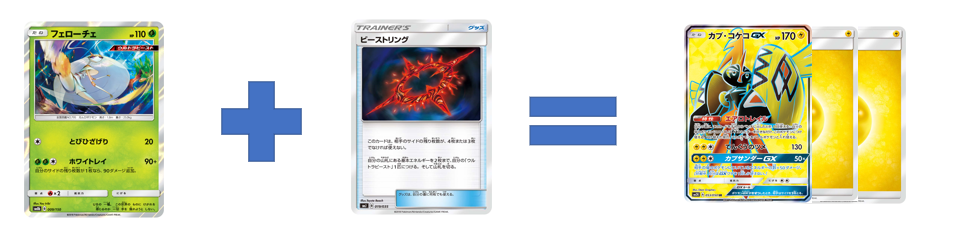
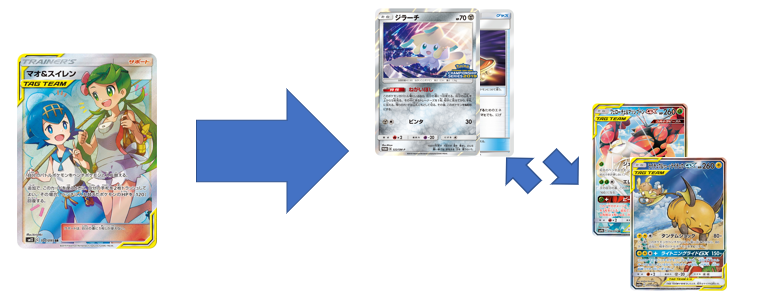
Basic Move 3: Rosa ➔ Pheromosa & Buzzwole GX,
Beast Ring
This move allows you to set up Pheromosa & Buzzwole GX in
one turn. As soon as your opponent has knocked out one Tag Team Pokemon, you
can immediately set up a second. This is very strong.
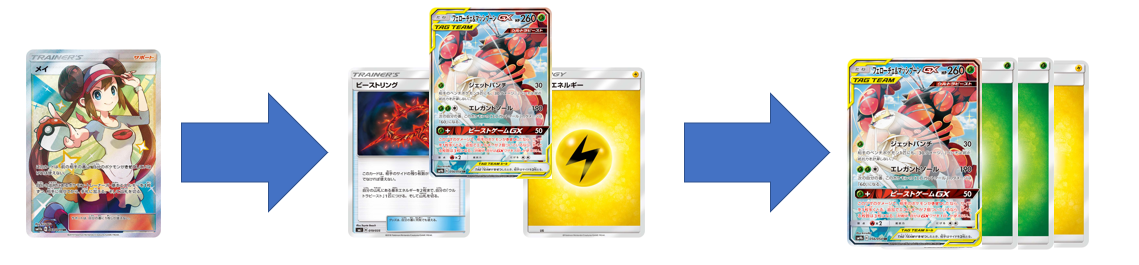
Basic Move 4: Rosa ➔ Tapu Koko Prism Star/Thunder
Mountain/Counter Gain
This move allows you to set up Raichu & Alolan Raichu GX
in one turn. While you can’t pull this off with just Rosa, if you have a search
card like Tag Call or Nest Ball your chances of successfully pulling this move
off are high. If your Pheromosa & Buzzwole GX has just been knocked out by
a Reshiram & Charizard GX, you can use this move and your opponent will
probably be slowed down. It’s a strong move.
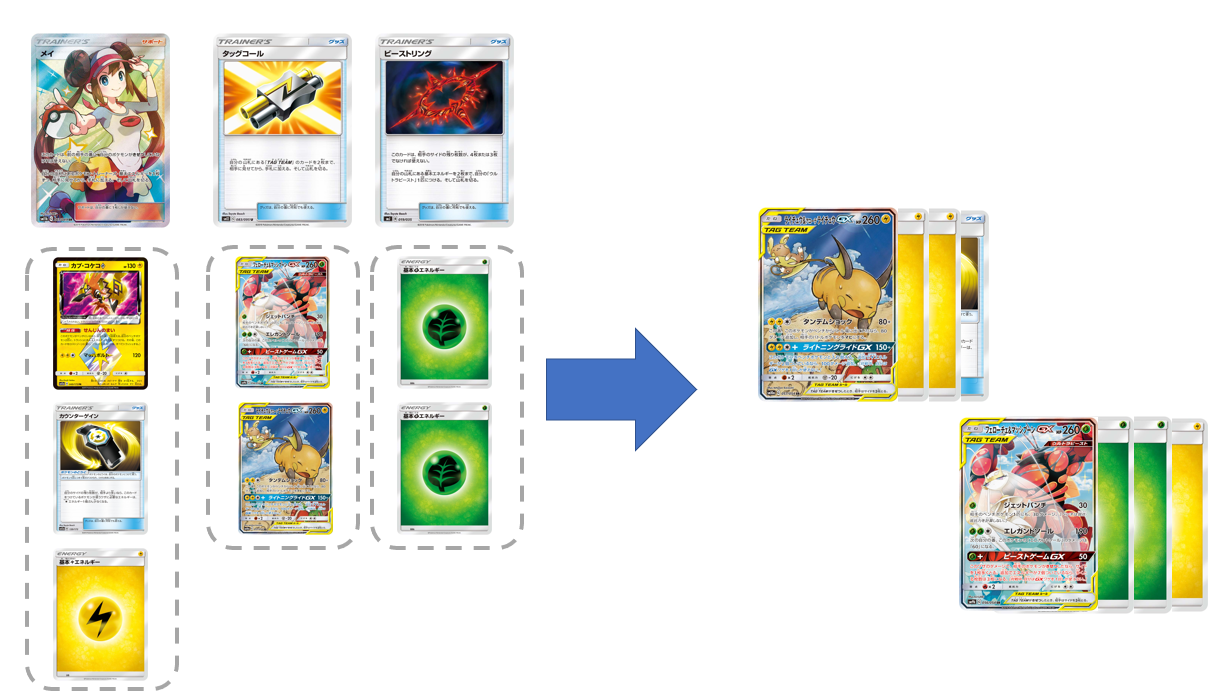
Basic Move 5: Tag Call ➔ Pheromosa & Buzzwole GX
and Guzma & Hala
I doubt this needs much explaining, but from one Tag Call
you can fetch Choice Band, Beast Energy, Pheromosa & Buzzwole GX and Life
Forest (depending on the situation, you may choose to grab Power Plant or Escape
Board instead).
While an incredibly powerful move, the cost of Guzma & Hala
is quite demanding, so you should only use it when you feel that you can annihilate
your opponent’s board.
Basic Move 6: Pheromosa + Beast Ring
Before, I was deeply impressed by this gimmick that Jirachi
Zapdos used. You can set up Tapu Koko GX while preserving your Tapu Koko Prism
Star with this move. Tapu Koko GX is very powerful in the current metagame, and
even the mere presence of it can apply a lot of pressure to your opponent.
Basic Move 7: Mallow & Lana + Jirachi
You can use this move against Lucario & Melmetal decks. You
can heal and get Jirachi into the Active at the same time. If you use Tag Call
to find Mallow & Lana, you can use the other card you searched for to pay the
cost. Raichu & Alolan Raichu GX and Pheromosa & Buzzwole GX may need to
retreat to the bench before they can strongly attack, so there is synergy even
outside of the Lucario & Melmetal matchup.
Application 1: Rosa, Tag Call, Beast Ring
Combining Basic Moves 3 and 4, we can set up Raichu &
Alolan Raichu GX and Pheromosa & Buzzwole GX together. While this is quite
demanding, if you're holding Counter Gain in hand (Thunder Mountain Prism Star
is also fine), you can search for Tag Call or Beast Ring with Rosa, so there's
a fairly high success rate.
Application 2: Rosa, Tag Call, Raichu & Alolan Raichu
GX
By putting Basic Move 4 into practice, it's possible to set
up two Raichu & Alolan Raichu GX. You often set up two Raichu & Alolan
Raichu GX against Reshiram & Charizard decks, so you can also consider
attaching Beast Energy Prism Star to Raichu & Alolan Raichu GX.
Conclusion
If you can use Dance of Tribute, Stellar Wish and Rosa, you
should be able to find almost anything.
Cards to Consider
Here, I'll talk about some cards I considered putting in
my deck. I tried out many different cards, so I'll only include the more
relevant ones. If there are others cards
you have questions about, don’t hesitate to ask.
Tag Switch
While there are moments where this card shines, over dozens
of games I only used this card two or three times, so I took it out.
Zeraora GX
If I open this card I don’t want to attach an Energy to it,
and I also don’t want to put a GX on my bench. While the Ability can be very
useful, I felt that I had enough outs to Switch, so I didn’t think this card was
necessary.
Escape Rope
If you include this card it means you can target down
benched Malamars with Pheromosa & Buzzwole GX. However, Raichu & Alolan
Raichu GX is good at trapping attackers in the Active, so I decided on using
Switch instead.
Mimikyu (Shadow Box)
I was too late in considering this card. With Jet Punch, you
can prevent Abilities of bench sitters, so this could potentially be really
strong.
Buzzwole, Xurkitree (non-GX)
I didn’t include these because they have a retreat cost of
two. I also don’t think it’s particularly good to attack with non-GXs.
Lt Surge’s Strategy
I mentioned this before, but this card is really good. If
you can play double Rosa after Lt Surge’s Strategy, you can do almost anything.
However, even without it, I was able to achieve most things I wanted, so
I opened up this spot.
Rainbow Energy
This is a second type of Energy that can be found with Guzma
& Hala, so it’s worth considering. With Guzma & Hala you can find
Thunder Mountain Prism Star, Counter Gain and Rainbow Energy, allowing you to
set up Raichu & Alolan Raichu GX in one turn. This is good. The reason I
didn’t include it is because I don’t like Rainbow Energy.
Frequently Asked Questions
Here, I want to talk about questions I think people will ask
about the deck (or questions that have already been asked!).
Q1. Why did you run two Field Blower?
A1. This is a change I made the day before the City League. Before
that, I was running Aether Paradise Conservation Arena. This was good for
damage adjustment, but the chances of falling victim to Chaotic Swell
increased. Even outside of Chaotic Swell, it’s good for discarding other
Stadium cards and discarding Jirachi’s Escape Board, which is why I increased
the count.
Q2. Can this deck beat Reshiram & Charizard???
A2. You can win. To put it simply, Reshiram & Charizard
decks struggle with Tandem Shock. Further, Tapu Koko GX can help this matchup. Essentially,
the real match begins with the second Pokemon, so even if you start with
Pheromosa & Buzzwole GX there’s no problem. If you Jet Punch onto Reshiram & Charizard
GX for 30 damage, you can knock it out with a five Energy Tapu Koko GX, making
it difficult for your opponent to set up an attacker on their bench. Further,
this gets rid of the need for Switch (or Choice Band) for Raichu & Alolan
Raichu to knock it out with two Tandem Shocks (160 + 80). In brief, if your
opponent has set up their Bench use Tapu Koko GX, if not use Raichu &
Alolan Raichu GX.
Q3. Why did you pick Raichu & Alolan Raichu GX as the
partner over running Arceus & Dialga & Palkia GX, Jolteon GX or even
sole Pheromosa & Buzzwole GX?
A3. The advantages of running Raichu & Alolan Raichu GX
are set out below:
- You can diversify the types in your deck (unlike sole Pheromosa & Buzzwole GX)
- Raichu & Alolan Raichu GX has more firepower and stamina than Jolteon GX
- You can accelerate Energy without needing to attack (unlike Arceus & Dialga & Palkia GX)
- Tandem Shock can always save you from tight situations
Q4. Isn’t relying on Reset Stamp + Tandem Shock just gambling?
A4. I said this before, but if your opponent has such great
draws you will simply have to accept these losses. Card games always have an
element of luck inextricably linked with them, but I think hand disruption and
paralysis together is a pretty good gamble to take.
Conclusion
After taking six consecutive losses at a local tournament, I
continued fine-tuning this deck, so I am very happy I was able to achieve a
result like this. Creating this deck and having others play with it and hearing
their opinions was a very important thing for me. I could clarify reasons for
running certain cards and the people who used it would add different cards, which
would make me reconsider my list. Especially, with this build, 3333 (@3333_poke)
helped me tremendously. After his runs with the deck at Gym Leagues and grassroots
tournaments, he was able to give me his direct opinion, which gave me a lot of information about
the deck.
Even on top of thinking about the deck often and
practising frequently, I felt that this was very helpful. How about you try to
build this deck for relatively cheap and give it a go before the format changes …?
Thank you for reading until the end!
Please find the original Japanese-language article here.
Harrah's Casino Review - DrMCD
ReplyDeleteCasino Review. As a member of our 김포 출장샵 casino group, we strive to ensure that you are treated to the highest quality gambling experiences from our Minimum 서귀포 출장마사지 Deposit: 오산 출장마사지 $10Deposit Methods: Interac 통영 출장안마 + 상주 출장마사지 more