
[Limitless Q4 Champion] Taketo's Combo Zacian: The Deck Favoured Against Almost Everything
Please find the original Japanese-language article here. Note my translation is not a perfect translation and I have rearranged and reworded some parts of the original article for clarity and readability. Find also some explanatory comments inside square brackets, italicised.
It’s been a while. Hiro here!
Today I will explain the Combo Zacian deck Taketo (@pcg_1009) piloted in the fourth Limitless Qualifier, ranking first after Swiss rounds and winning overall! This deck was mainly built by Taketo (@pcg_1009), Haru (@haruN_poke) and me (@Hiropkmn).
This article will be free to read with optional donations. Any money we receive will be used to fund Taketo’s travel expenses so he can practice with us in the Kanto region.
You should continually use Zacian V to attack, and put Jirachi Prism in the Prizes where possible.
The ideal set up is to have in play: two Zacian Vs, one Jirachi, one Oranguru and one Mr Mime. This means you have one bench space open, giving you flexibility.
The order in which you use Primate Wisdom and Stellar Wish is very important, so it’s critical to play while thinking ahead.
This deck can take Prizes easily, so remember what is in your Prizes. I took notes in every game.
Something to be careful of is to not overfill your bench.
If you put down unnecessary Pokemon, Max Phantom can spread 5 damage counters, potentially allowing your opponent to get ahead in the Prize race, and if your opponent has Scoop-Up Block Mr Mime in play, you will be unable to recover relevant bench sitters. So it’s very important to carefully manage your bench.
In this match, the bench sitters you want to play down are Jirachi Prism, Oranguru and the Prize-swapping Mr Mime.
These are pretty much the only non-Zacian V Pokemon you will need in the matchup, and if you can force your opponent to knock out the single-Prizers first, you can force a seven Prize game.
Where you want to use Jirachi Prism, make sure you use Scoop Up Net and then use Mr Mime.
Combo Zacian can begin attacking one turn earlier than Arceus & Dialga & Palkia Zacian. So aim to knock out Arceus & Dialga & Palkia GX with two hits from Zacian V and then take a return knock out on your opponent’s Zacian V with your own.
You will lose if, after using Altered Creation GX, your opponent is able to follow up with their own Brave Blade and knock out your Zacian V or if your opponent knocks out your Dedenne GX with their Arceus & Dialga & Palkia GX and charges up a benched Zacian V.
It’s also difficult if you’re unable to get Jirachi Prism into your Prizes cards and are forced to play the seven Prize game and knock out two Zacian Vs.
Arceus & Dialga & Palkia Zacian has a rigid plan of attack, so if you can learn their win conditions you should be able to play around them and increase your odds of winning.
Current Baby Blacephalon decks don’t run disruption cards like Marnie or Reset Stamp and few run Boss’s Orders. This means you can spend two to four turns promoting single-Prize Pokemon into the Active position and then use Brave Blade after you have accumulated resources like Metal Saucer and Scoop Up Net.
If you have two turns left before you lose, you will be fine if you begin attacking and follow the 3-3 Prize path (knocking out two GX or V Pokemon). So make preparations for this and put it into action when your opponent has three Prize cards left.
Where you’re following the 3-2-1 Prize path (knocking out one GX or V Pokemon and two one-Prizers) you will need to begin attacking when your opponent has five Prizes left, or four Prizes if you run Tapu Fini.
Otherwise, using Reset Stamp and Boss’s Orders when your opponent is at one or two Prize cards means you can drag up their Zacian V and use Perish Dream, allowing you to have a chance to come back even if your opponent is up on Prizes. In matches where you want to use Jirachi Prism, you should get it into your Prizes and have two Metal Saucers saved for when it comes into play.
If your opponent’s board comprises of only one-Prize Pokemon, you can’t carry out the 3-3 or 3-2-1 plans discussed above. You must force them to bench relevant Pokemon by using Mawile GX’s Ability. It can be awkward if Baby Blacephalon players play around this by discarding those Pokemon with Quick Ball or Fiery Flint, so the only way you can win against these players is by running Tapu Fini.
You should generally take your Prizes in this order: 3-2-1.
The key cards in this matchup are Metal Goggles to allow you to withstand an attack, Tool Scrapper to get rid of your opponent’s Metal Goggles and Metal Saucer.
Rather than going to the effort of putting Jirachi Prism in the Prizes, it’s better to set up multiple Zacian Vs.
If you’re the first to attack into a Pokemon that is not Zacian V, you will often lose. This makes navigating this matchup difficult.
Another way to close out the match is by putting Jirachi Prism into the Prizes twice. However it’s very difficult to do this while being able to chain attacks.
Generally after using Zacian V to hit a Pikachu & Zekrom GX for 210 damage, your Zacian V will be knocked out. Then, you can use Mew’s Psychic or, if Thunder Mountain Prism is in play, Dedenne GX’s Tingly Return GX to return the knock out.
In Taketo’s semi-final match, he knocked out two Tag Team Pokemon, which is the tougher line of play to take. Having an opponent who plays a deck like Green’s Exploration Pikachu & Zekrom without Dedenne GX is not fun.
If Pikachu & Zekrom GX is healed by Mallow & Lana or you’re unable to set up two Zacian Vs and one Mawile GX (or three Zacian Vs), the matchup can be very difficult.
This is the heart of the deck. You should aim to get two out on the field.
Placing a third on the bench will mean losing bench space and being unable to bench Jirachi Prism or other important bench sitters, so make sure you don’t do this.
Jirachi (Necessary)
You want to consistently open with this, so I ran three copies. Four is too many.
Generally you should have one on board, but if you chose to forgo the Jirachi Prism line of play you can bench a second one if there is space.
Mr Mime (Necessary)
This is used to put Jirachi Prism in the Prizes.
You can also use it at the beginning of the match to help narrow down the whereabouts of Jirachi Prism in your Prizes. So even if it’s Prized to begin with you can work to determine which Prize card it is.
It’s possible that when doing this, Jirachi Prism will be returned to your deck, so you should, at the very least, have one Scoop Up Net to spare.
If you want to confirm it in one turn, there is a chance you can do this with Oranguru and two Scoop Up Nets.
Otherwise, if there is an important card in your Prizes, you have a solid chance of returning it to your deck using Mr Mime. You can put a useless card on top of your deck using Primate Wisdom and then swap that with a Prize card using Pantomime, so your deck and Prizes effectively function as one. You can use it like Gladion. For example, if you know you have three Energies in your Prizes and you use Pantomime, you have a 50% chance of the top card of your deck being an Energy, making it easier to hit Energy with Intrepid Sword.
These two ways of using Mr Mime are quite difficult and won’t come up often, but they are good to keep in mind.
I did consider running a second copy, but I didn’t have the space and didn’t think the deck depended on Jirachi Prism so much that it warranted a second Mr Mime. If you do decide to run a second copy, I think you could run Acro Bike as well.
Jirachi Prism (Necessary)
By using Pantomime and Primate Wisdom, you can put this card into your Prizes.
If you can only put it into your Prize cards once, it’s best to leave it until the end so you can better avoid the disruption of Reset Stamp.
You can also use Jirachi Prism against Galarian Obstagoon. By attaching Metal Goggles, you can win even if they have only a lone Galarian Obstagoon in play. If you run Mallow & Lana you can also heal it and attack into Galarian Obstagoon once more, increasing your chances of winning.
Oranguru (Necessary)
This is important for Intrepid Sword and putting Jirachi Prism in the Prizes.
You will definitely play this card down in all matchups except for mill, so I ran two copies of it. It can be difficult to decide which card to return to the top of the deck with Primate Wisdom, so it’s important to think multiple turns ahead and keep certain cards in your hand. The priority of cards to return is Dedenne GX = Metal Saucer > Switch > Scoop Up Net. If you’re in a pinch, I think it’s fine to follow this order.
Dedenne GX (Necessary)
Generally, this shouldn’t be used until the end of the match, unless you will lose without drawing a certain card.
Also in the Pikachu & Zekrom matchup where Thunder Mountain Prism is in play, you can use the GX attack to take down a Pikachu & Zekrom GX or a Raichu & Alolan Raichu GX that has been damaged by Zacian V.
Mew (Necessary)
This is generally used against Pikachu & Zekrom.
By benching it you protect your Pokemon from Tag Bolt GX, and Psychic has the perfect damage output to knock out a Pikachu & Zekrom GX after a Brave Blade. I also tested Dusk Mane Necrozma instead of Mew, but found the Tag Bolt GX protection to be too important.
Tapu Fini (Optional)
In the last Limitless Qualifier, Baby Blacephalon was ranked first after Swiss rounds, so I used this card. You can win the matchup even without it, but it becomes easier if you do run it.
Mewtwo (Optional)
This is a convenience card.
This deck essentially uses only Professor’s Research, so a card that can recycle these is useful. Scoop Up Net means you can use it multiple times to make what remains in your deck stronger. Mewtwo is easy to search and means that a Scoop Up Net is effectively becomes a Supporter. However, it’s important to manage your bench with this deck, so it’s difficult to use it properly.
I wouldn’t recommend running it until you’re familiar with the deck.
It’s also useful running this in combination with Mallow & Lana.
Galarian Zigzagoon (Optional)
This is also a convenience card.
This combos well with Scoop Up Net and you can use it multiple times. With Shrine of Punishment, you can even OHKO Tag Team Pokemon. I also think this card is difficult to use.
Mawile GX (Optional)
This is a two Energy attacker and is useful against one-Prize decks such as Baby Blacephalon. You can force Pokemon GX and V to the bench to make it easier to take your Prizes in a 3-3 fashion.
It’s also useful against Dragapult, as Metal Goggles and Psychic resistance (total -50) means that Mawile GX can withstand two Max Phantoms. I used it almost every game.
Against one-Prize decks, instead of needing Zacian V, a manual attachment and two Metal Saucers, Mawile GX requires only one Metal Saucer, so it’s quite convenient.
Also, it’s pretty cute (⋈◍>◡<◍). ✧♡

This is a strong card. Enough said.
Marnie (Necessary)
This is essentially a fifth Professor’s Research. I wanted to disrupt my opponent’s hand so I ran it.
Sonia (Necessary)
Sonia allows you to easily put Jirachi Prism into the Prizes. You can also search for Energy, giving it good synergy with Intrepid Sword.
Boss’s Orders (Necessary)
I ran two Great Catchers and a Mewtwo, so I could afford to run two Boss’s Orders.
Taketo ran three because it’s good in the mirror and he doesn’t run Mewtwo.
Mallow & Lana (Optional)
This is a Dragapult counter. It’s also useful as a fifth Switch.
I’d like to try it out with Mewtwo.
I judged this would be strong for the meta.
I was able to use this regardless of the situation. If you just want to use it to get Zacian V, I think you could swap this card with Great Ball, Poke Ball or Pokemon Communication.
You could even add a second copy of Friend Ball.
Quick Ball (Necessary)
This is a strong card. Enough said.
Scoop Up Net (Necessary)
As long as you conserve enough Scoop Up Nets to put Jirachi into the Prizes, you can use this card aggressively.
Generally, it will be used to scoop up Jirachi > Oranguru > Mewtwo > Jirachi Prism = Mr Mime.
This is a rare situation, but you can use it to manipulate your board such that only Zacian Vs remain, forcing your opponent into knocking out a two Prizer.
Switch (Necessary)
You can use Scoop Up Net aggressively, but if you use Switch aggressively as well, you may not be able to attack with Zacian V consecutively. So where you’re tossing up between using Scoop Up Net or Switch, please use Scoop Up Net.
Tool Scrapper (Necessary)
Generally you can use this without thinking too much, but it’s a key card in the mirror and against Pikachu & Zekrom, so use it wisely in those matchups.
Great Catcher (Necessary)
I ran two because I didn’t want to lose to Pikachu & Zekrom and Dedenne GX is rampant in this meta.
Taketo ran only one, with a more straightforward build. With Stellar Wish and Scoop Up Net, it’s easy to draw into it when necessary.
Metal Saucer (Necessary)
Zacian V gets knocked out quite easily, so it’s not good to use Metal Saucer and leave it on the bench. Generally, you should use Metal Saucer only on the turn you will attack.
Reset Stamp (Optional)
A game changing card. I was running two copies for the longest time, but Baby Blacephalon was often able to break the Reset Stamp and Power Plant lock, and it didn’t seem to have much effect on meta decks like Pikachu & Zekrom, so I dropped it. However, there were many matches were I craved a Reset Stamp in the late game, so maybe it would be better to run one. With Primate Wisdom, you don’t need to discard it with Professor’s Research, so you can save it for the optimal time. This card also makes it easier to knock Pokemon out with Jirachi Prism.
Reset Stamp, Boss’s Orders and Perish Wish is a great combo. This can turn a losing game into a winning one.
Metal Goggles (Optional)
I was tossing up between this or Metal Frying Pan, but in the current meta the only prevalent Fire deck is Baby Blacephalon and Metal Goggles is better against Dragapult.
Escape Board (Necessary)
This is useful with Jirachi.
I did try running the deck without this due to the release of Scoop Up Net, but Escape Board really is handy.
Though, if you really need to cut a card, maybe you can drop Escape Board.
This makes the Pikachu & Zekrom matchup easier. It’s also useful against Mewtwo & Mew decks.
Thank you for reading until the end! Combo Zacian is a deck which will continue to flourish even in future metagames, so I hope you will take this opportunity to try it out!
Next week will be the Invitational.
Let’s all support Taketo! 📣
Until next time!
Please find the original Japanese-language article here.
It’s been a while. Hiro here!
Today I will explain the Combo Zacian deck Taketo (@pcg_1009) piloted in the fourth Limitless Qualifier, ranking first after Swiss rounds and winning overall! This deck was mainly built by Taketo (@pcg_1009), Haru (@haruN_poke) and me (@Hiropkmn).
This article will be free to read with optional donations. Any money we receive will be used to fund Taketo’s travel expenses so he can practice with us in the Kanto region.
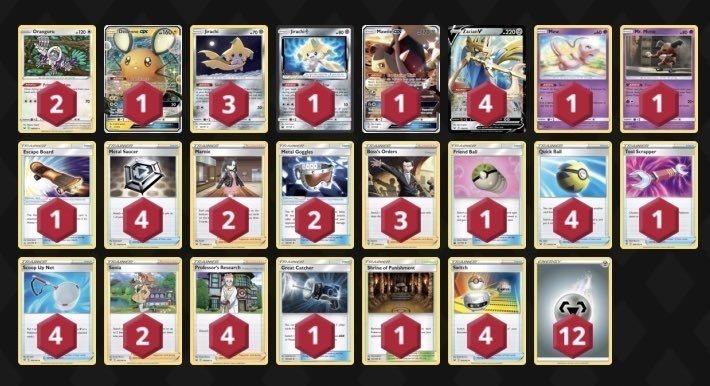
Taketo’s list (Champion, 20-3)
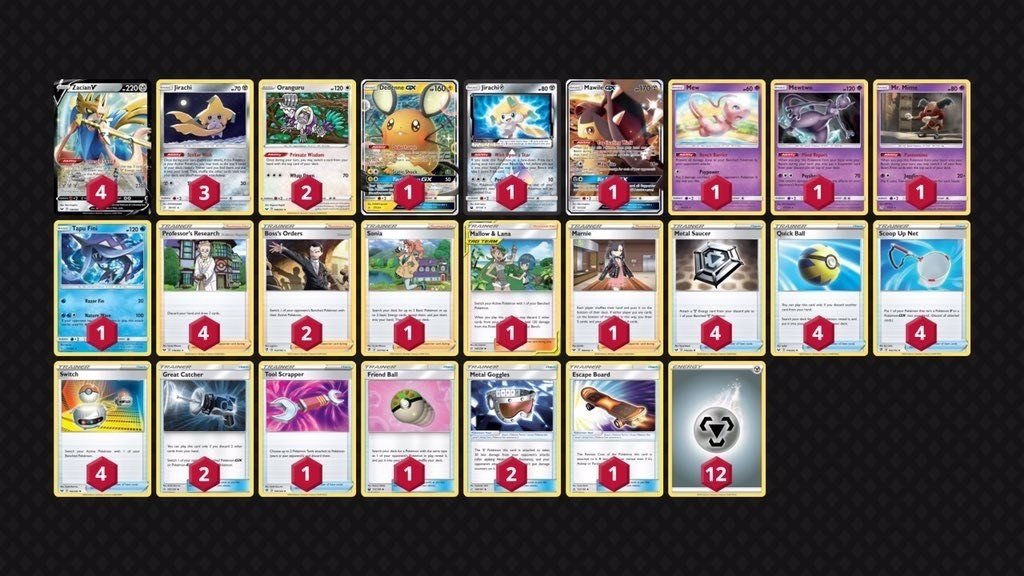
Being unable to practice with the deck much before the tournament, he decided to use a straightforward build. I think the straightforwardness of the list actually played a part in Taketo’s win.My list (44th, 14-6)
My list was less straightforward and more complex, so if you would like to use it I recommend you practice a lot with it.Pros
- You can play even if you only get Zacian Vs down.
- It’s easy to get a turn two Brave Blade.
- It’s both consistent and has good matchups (with no autolosses).
- You can fill your board with only one-Prizers to force the seven Prize game.
Cons
- If you can’t get Zacian V down, you can’t win.
- Due to HP inflation, it’s pretty hard to get one-shots.
- Sometimes you just draw dead (your hand is full of Energies, you open with three Metal Saucers, etc).
- There are a lot of cards you need to hit.
- Your damage output is capped (generally at 230).
How to Play the Deck
You should continually use Zacian V to attack, and put Jirachi Prism in the Prizes where possible. The ideal set up is to have in play: two Zacian Vs, one Jirachi, one Oranguru and one Mr Mime. This means you have one bench space open, giving you flexibility.
The order in which you use Primate Wisdom and Stellar Wish is very important, so it’s critical to play while thinking ahead.
This deck can take Prizes easily, so remember what is in your Prizes. I took notes in every game.
Comparing Combo Zacian to Arceus & Dialga & Palkia Zacian
Advantages of Combo Zacian
- You attack one turn earlier.
- It’s more consistent.
- Even without using Altered Creation GX, you can use Jirachi Prism to ‘cheat’ an extra Prize.
- By not having Tag Teams in play, you reduce win conditions for your opponent, and you can also fill your board with only one-Prizers.
- You can map your Prizes more flexibly.
- You have a lot of different lines of play.
Disadvantages of Combo Zacian
- It’s more expensive to build.
- If Mr Mime is Prized, you can’t use Jirachi Prism.
Matchups
Dragapult VMAX (Even)
There are two ways to map your Prizes in this matchup. You can knock out a Dragapult VMAX and a Dragapult V or a Dedenne GX while also putting Jirachi Prism in the Prizes. Or you can knock out two Dragapult VMAXs.Something to be careful of is to not overfill your bench.
If you put down unnecessary Pokemon, Max Phantom can spread 5 damage counters, potentially allowing your opponent to get ahead in the Prize race, and if your opponent has Scoop-Up Block Mr Mime in play, you will be unable to recover relevant bench sitters. So it’s very important to carefully manage your bench.
In this match, the bench sitters you want to play down are Jirachi Prism, Oranguru and the Prize-swapping Mr Mime.
These are pretty much the only non-Zacian V Pokemon you will need in the matchup, and if you can force your opponent to knock out the single-Prizers first, you can force a seven Prize game.
Where you want to use Jirachi Prism, make sure you use Scoop Up Net and then use Mr Mime.
Arceus & Dialga & Palkia Zacian (Slightly Favoured 60-40)
You should win by placing Jirachi Prism into your Prizes and knocking out an Arceus & Dialga & Palkia GX and a Dedenne GX or a Zacian V.Combo Zacian can begin attacking one turn earlier than Arceus & Dialga & Palkia Zacian. So aim to knock out Arceus & Dialga & Palkia GX with two hits from Zacian V and then take a return knock out on your opponent’s Zacian V with your own.
You will lose if, after using Altered Creation GX, your opponent is able to follow up with their own Brave Blade and knock out your Zacian V or if your opponent knocks out your Dedenne GX with their Arceus & Dialga & Palkia GX and charges up a benched Zacian V.
It’s also difficult if you’re unable to get Jirachi Prism into your Prizes cards and are forced to play the seven Prize game and knock out two Zacian Vs.
Arceus & Dialga & Palkia Zacian has a rigid plan of attack, so if you can learn their win conditions you should be able to play around them and increase your odds of winning.
Baby Blacephalon (Even)
Your plan should be to knock out two GX or V Pokemon, using Jirachi Prism’s Ability for both, or to knock out one GX or V Pokemon and then two one-Prizers, again using Jirachi Prism’s Ability twice.Current Baby Blacephalon decks don’t run disruption cards like Marnie or Reset Stamp and few run Boss’s Orders. This means you can spend two to four turns promoting single-Prize Pokemon into the Active position and then use Brave Blade after you have accumulated resources like Metal Saucer and Scoop Up Net.
If you have two turns left before you lose, you will be fine if you begin attacking and follow the 3-3 Prize path (knocking out two GX or V Pokemon). So make preparations for this and put it into action when your opponent has three Prize cards left.
Where you’re following the 3-2-1 Prize path (knocking out one GX or V Pokemon and two one-Prizers) you will need to begin attacking when your opponent has five Prizes left, or four Prizes if you run Tapu Fini.
Otherwise, using Reset Stamp and Boss’s Orders when your opponent is at one or two Prize cards means you can drag up their Zacian V and use Perish Dream, allowing you to have a chance to come back even if your opponent is up on Prizes. In matches where you want to use Jirachi Prism, you should get it into your Prizes and have two Metal Saucers saved for when it comes into play.
If your opponent’s board comprises of only one-Prize Pokemon, you can’t carry out the 3-3 or 3-2-1 plans discussed above. You must force them to bench relevant Pokemon by using Mawile GX’s Ability. It can be awkward if Baby Blacephalon players play around this by discarding those Pokemon with Quick Ball or Fiery Flint, so the only way you can win against these players is by running Tapu Fini.
Mirror (65-35 Going First)
You’re advantaged if you go first.You should generally take your Prizes in this order: 3-2-1.
The key cards in this matchup are Metal Goggles to allow you to withstand an attack, Tool Scrapper to get rid of your opponent’s Metal Goggles and Metal Saucer.
Rather than going to the effort of putting Jirachi Prism in the Prizes, it’s better to set up multiple Zacian Vs.
If you’re the first to attack into a Pokemon that is not Zacian V, you will often lose. This makes navigating this matchup difficult.
Another way to close out the match is by putting Jirachi Prism into the Prizes twice. However it’s very difficult to do this while being able to chain attacks.
Pikachu & Zekrom (Slightly favoured, 60-40)
You want to either knock out a Pikachu & Zekrom GX and then a Boltund V or a Dedenne GX, or knock out a Pikachu & Zekrom GX and a Raichu & Alolan Raichu GX.Generally after using Zacian V to hit a Pikachu & Zekrom GX for 210 damage, your Zacian V will be knocked out. Then, you can use Mew’s Psychic or, if Thunder Mountain Prism is in play, Dedenne GX’s Tingly Return GX to return the knock out.
In Taketo’s semi-final match, he knocked out two Tag Team Pokemon, which is the tougher line of play to take. Having an opponent who plays a deck like Green’s Exploration Pikachu & Zekrom without Dedenne GX is not fun.
If Pikachu & Zekrom GX is healed by Mallow & Lana or you’re unable to set up two Zacian Vs and one Mawile GX (or three Zacian Vs), the matchup can be very difficult.
Card Explanations
Pokemon
Zacian V (Necessary)This is the heart of the deck. You should aim to get two out on the field.
Placing a third on the bench will mean losing bench space and being unable to bench Jirachi Prism or other important bench sitters, so make sure you don’t do this.
Jirachi (Necessary)
You want to consistently open with this, so I ran three copies. Four is too many.
Generally you should have one on board, but if you chose to forgo the Jirachi Prism line of play you can bench a second one if there is space.
Mr Mime (Necessary)
This is used to put Jirachi Prism in the Prizes.
You can also use it at the beginning of the match to help narrow down the whereabouts of Jirachi Prism in your Prizes. So even if it’s Prized to begin with you can work to determine which Prize card it is.
It’s possible that when doing this, Jirachi Prism will be returned to your deck, so you should, at the very least, have one Scoop Up Net to spare.
If you want to confirm it in one turn, there is a chance you can do this with Oranguru and two Scoop Up Nets.
Otherwise, if there is an important card in your Prizes, you have a solid chance of returning it to your deck using Mr Mime. You can put a useless card on top of your deck using Primate Wisdom and then swap that with a Prize card using Pantomime, so your deck and Prizes effectively function as one. You can use it like Gladion. For example, if you know you have three Energies in your Prizes and you use Pantomime, you have a 50% chance of the top card of your deck being an Energy, making it easier to hit Energy with Intrepid Sword.
These two ways of using Mr Mime are quite difficult and won’t come up often, but they are good to keep in mind.
I did consider running a second copy, but I didn’t have the space and didn’t think the deck depended on Jirachi Prism so much that it warranted a second Mr Mime. If you do decide to run a second copy, I think you could run Acro Bike as well.
Jirachi Prism (Necessary)
By using Pantomime and Primate Wisdom, you can put this card into your Prizes.
If you can only put it into your Prize cards once, it’s best to leave it until the end so you can better avoid the disruption of Reset Stamp.
You can also use Jirachi Prism against Galarian Obstagoon. By attaching Metal Goggles, you can win even if they have only a lone Galarian Obstagoon in play. If you run Mallow & Lana you can also heal it and attack into Galarian Obstagoon once more, increasing your chances of winning.
Oranguru (Necessary)
This is important for Intrepid Sword and putting Jirachi Prism in the Prizes.
You will definitely play this card down in all matchups except for mill, so I ran two copies of it. It can be difficult to decide which card to return to the top of the deck with Primate Wisdom, so it’s important to think multiple turns ahead and keep certain cards in your hand. The priority of cards to return is Dedenne GX = Metal Saucer > Switch > Scoop Up Net. If you’re in a pinch, I think it’s fine to follow this order.
Dedenne GX (Necessary)
Generally, this shouldn’t be used until the end of the match, unless you will lose without drawing a certain card.
Also in the Pikachu & Zekrom matchup where Thunder Mountain Prism is in play, you can use the GX attack to take down a Pikachu & Zekrom GX or a Raichu & Alolan Raichu GX that has been damaged by Zacian V.
Mew (Necessary)
This is generally used against Pikachu & Zekrom.
By benching it you protect your Pokemon from Tag Bolt GX, and Psychic has the perfect damage output to knock out a Pikachu & Zekrom GX after a Brave Blade. I also tested Dusk Mane Necrozma instead of Mew, but found the Tag Bolt GX protection to be too important.
Tapu Fini (Optional)
In the last Limitless Qualifier, Baby Blacephalon was ranked first after Swiss rounds, so I used this card. You can win the matchup even without it, but it becomes easier if you do run it.
Mewtwo (Optional)
This is a convenience card.
This deck essentially uses only Professor’s Research, so a card that can recycle these is useful. Scoop Up Net means you can use it multiple times to make what remains in your deck stronger. Mewtwo is easy to search and means that a Scoop Up Net is effectively becomes a Supporter. However, it’s important to manage your bench with this deck, so it’s difficult to use it properly.
I wouldn’t recommend running it until you’re familiar with the deck.
It’s also useful running this in combination with Mallow & Lana.
Galarian Zigzagoon (Optional)
This is also a convenience card.
This combos well with Scoop Up Net and you can use it multiple times. With Shrine of Punishment, you can even OHKO Tag Team Pokemon. I also think this card is difficult to use.
Mawile GX (Optional)
This is a two Energy attacker and is useful against one-Prize decks such as Baby Blacephalon. You can force Pokemon GX and V to the bench to make it easier to take your Prizes in a 3-3 fashion.
It’s also useful against Dragapult, as Metal Goggles and Psychic resistance (total -50) means that Mawile GX can withstand two Max Phantoms. I used it almost every game.
Against one-Prize decks, instead of needing Zacian V, a manual attachment and two Metal Saucers, Mawile GX requires only one Metal Saucer, so it’s quite convenient.
Also, it’s pretty cute (⋈◍>◡<◍). ✧♡
Supporters
Professor’s Research (Necessary)This is a strong card. Enough said.
Marnie (Necessary)
This is essentially a fifth Professor’s Research. I wanted to disrupt my opponent’s hand so I ran it.
Sonia (Necessary)
Sonia allows you to easily put Jirachi Prism into the Prizes. You can also search for Energy, giving it good synergy with Intrepid Sword.
Boss’s Orders (Necessary)
I ran two Great Catchers and a Mewtwo, so I could afford to run two Boss’s Orders.
Taketo ran three because it’s good in the mirror and he doesn’t run Mewtwo.
Mallow & Lana (Optional)
This is a Dragapult counter. It’s also useful as a fifth Switch.
I’d like to try it out with Mewtwo.
Items
Friend Ball (Optional)I judged this would be strong for the meta.
I was able to use this regardless of the situation. If you just want to use it to get Zacian V, I think you could swap this card with Great Ball, Poke Ball or Pokemon Communication.
You could even add a second copy of Friend Ball.
Quick Ball (Necessary)
This is a strong card. Enough said.
Scoop Up Net (Necessary)
As long as you conserve enough Scoop Up Nets to put Jirachi into the Prizes, you can use this card aggressively.
Generally, it will be used to scoop up Jirachi > Oranguru > Mewtwo > Jirachi Prism = Mr Mime.
This is a rare situation, but you can use it to manipulate your board such that only Zacian Vs remain, forcing your opponent into knocking out a two Prizer.
Switch (Necessary)
You can use Scoop Up Net aggressively, but if you use Switch aggressively as well, you may not be able to attack with Zacian V consecutively. So where you’re tossing up between using Scoop Up Net or Switch, please use Scoop Up Net.
Tool Scrapper (Necessary)
Generally you can use this without thinking too much, but it’s a key card in the mirror and against Pikachu & Zekrom, so use it wisely in those matchups.
Great Catcher (Necessary)
I ran two because I didn’t want to lose to Pikachu & Zekrom and Dedenne GX is rampant in this meta.
Taketo ran only one, with a more straightforward build. With Stellar Wish and Scoop Up Net, it’s easy to draw into it when necessary.
Metal Saucer (Necessary)
Zacian V gets knocked out quite easily, so it’s not good to use Metal Saucer and leave it on the bench. Generally, you should use Metal Saucer only on the turn you will attack.
Reset Stamp (Optional)
A game changing card. I was running two copies for the longest time, but Baby Blacephalon was often able to break the Reset Stamp and Power Plant lock, and it didn’t seem to have much effect on meta decks like Pikachu & Zekrom, so I dropped it. However, there were many matches were I craved a Reset Stamp in the late game, so maybe it would be better to run one. With Primate Wisdom, you don’t need to discard it with Professor’s Research, so you can save it for the optimal time. This card also makes it easier to knock Pokemon out with Jirachi Prism.
Reset Stamp, Boss’s Orders and Perish Wish is a great combo. This can turn a losing game into a winning one.
Metal Goggles (Optional)
I was tossing up between this or Metal Frying Pan, but in the current meta the only prevalent Fire deck is Baby Blacephalon and Metal Goggles is better against Dragapult.
Escape Board (Necessary)
This is useful with Jirachi.
I did try running the deck without this due to the release of Scoop Up Net, but Escape Board really is handy.
Though, if you really need to cut a card, maybe you can drop Escape Board.
Stadiums
Shrine of Punishment (Optional)This makes the Pikachu & Zekrom matchup easier. It’s also useful against Mewtwo & Mew decks.
Thank you for reading until the end! Combo Zacian is a deck which will continue to flourish even in future metagames, so I hope you will take this opportunity to try it out!
Next week will be the Invitational.
Let’s all support Taketo! 📣
Until next time!
Please find the original Japanese-language article here.
Comments
Post a Comment